

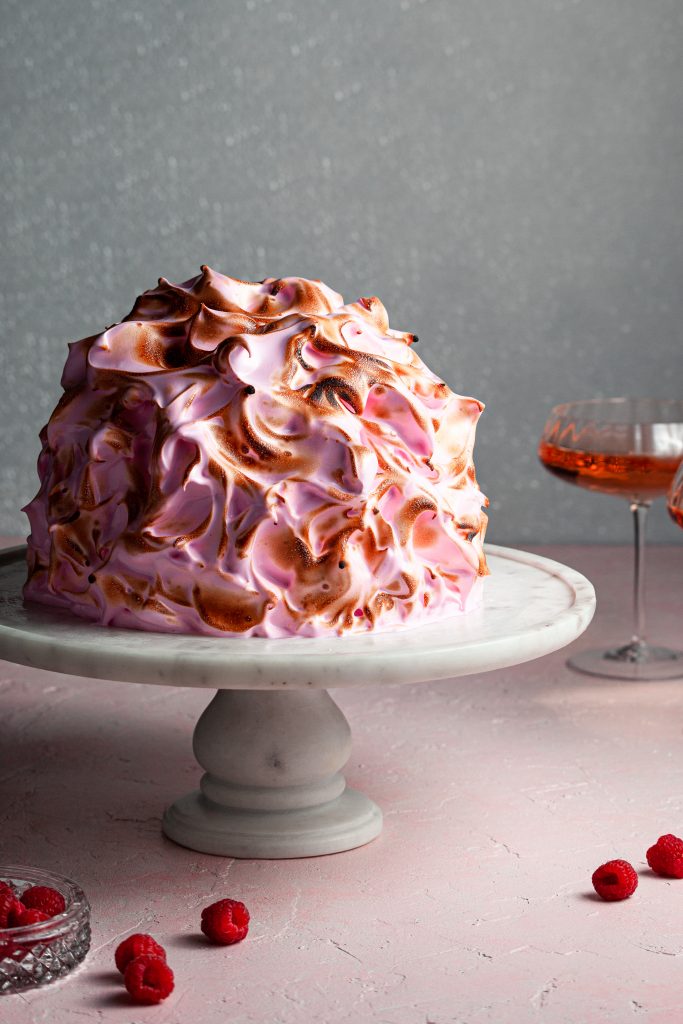
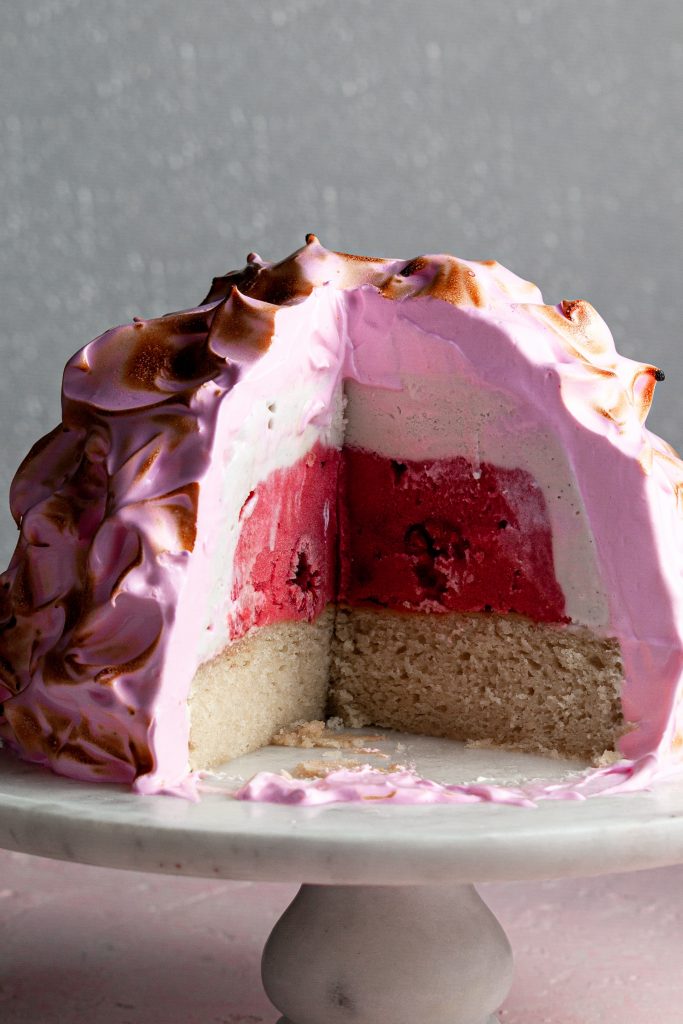
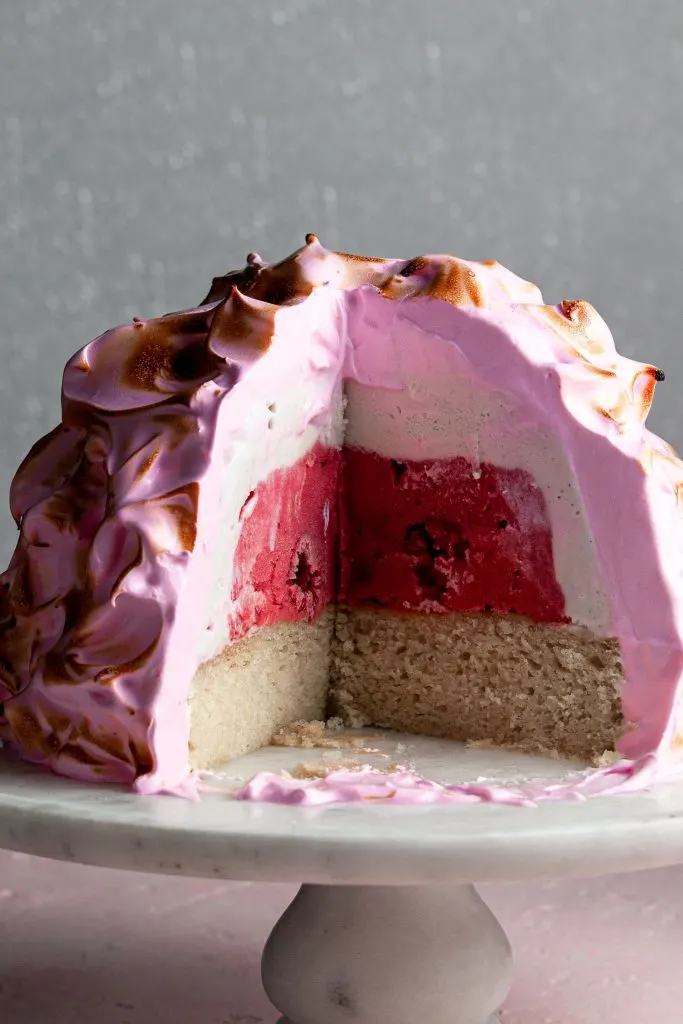
This Vegan Baked Alaska is a delicious showstopper dessert, yet simple to make! A dome of dairy-free vanilla ice cream, raspberry sorbet (or your favorite flavors!) sits on top of a vegan vanilla sponge cake, covered in a cloud of egg-free meringue! It’s a fantastic dairy-free and egg-free classic dessert for the holidays even if your group is small – simply pop the leftovers back in the freezer for tucking into later.
Thank you to Williams-Sonoma Canada for sponsoring this post. As always, all opinions are my own.
When I was little, my mom’s antique Five Roses Flour cookbook had a recipe for Baked Alaska. True to the design of an older cookbook, there weren’t many pictures nor was there one for the Baked Alaska. I was in awe wondering what this magical dessert looked like. It was like a unicorn – I, like everyone else I spoke to about it, had heard of the dessert but no one had actually seen one in real life. The recipe called for covering the ice cream and cake in meringue and then baking it…the concept blew my mind.

What is Baked Alaska?
Bombe Glacé (or Bombe) is a classic dessert: ice cream is frozen in a rounded or domed mold so it resembles a cannonball hence the name Bombe (although many are half spheres). Baked Alaska is a Bombe covered in meringue and then toasted in a very hot oven or under the broiler, or with a kitchen torch. This recipe goes for the latter technique which, honestly, just seems less stressful (and more fun.)
Many Baked Alaskas have a circle of cake under the dome of ice cream , while others aren’t domes at all and are molded into other shapes like logs or rectangles. Baked Alaska is a glorified vegan ice cream cake no matter the shape.
So how does the ice cream not melt in the oven if the baked Alaska is, indeed, baked? The meringue acts as an insulator around the ice cream so that it won’t melt in the short few minutes the baked Alaska is in there. The ice cream dome is also rock hard before torching so this is a dessert that needs to be started the day before you need it. Most of the time is idle just waiting for the dome to freeze.
If you want to get really fancy you can take your Bombe Alaska up a notch and create a baked Alaska flambé where you coat the meringue in hot high-proof spirits like rum before serving… and set it on fire. Can a dessert be more impressive than that?!

What Does Baked Alaska Taste Like?
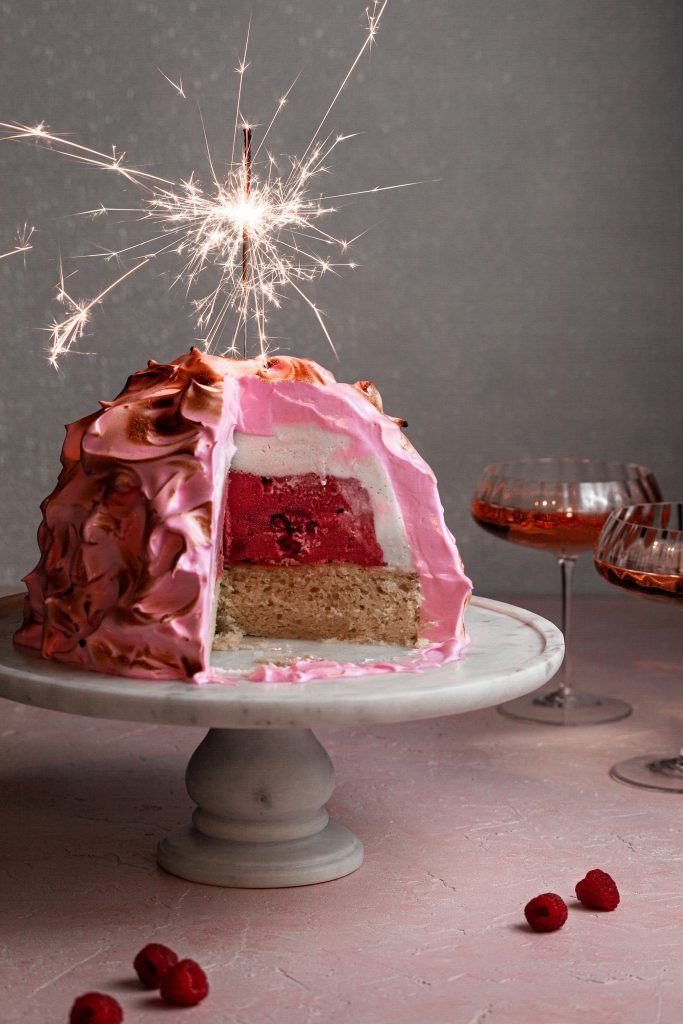
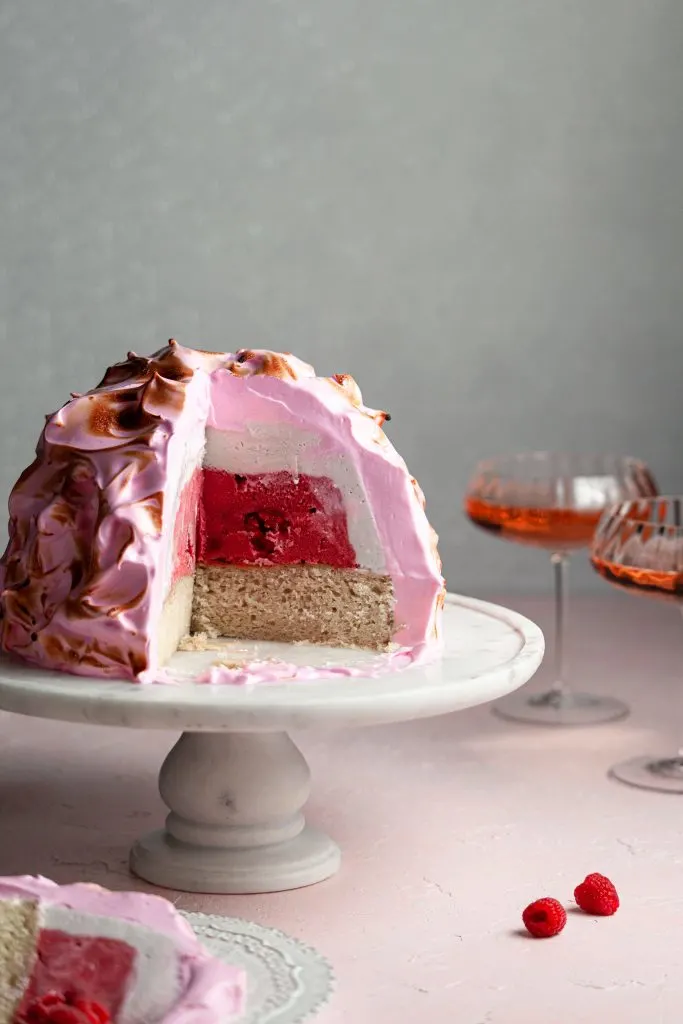
Baked Alaska can be made with most any kind of cake or ice cream you please, so you get to determine the flavors. I went with vanilla and raspberry ice creams with a vanilla cake, and vegan Italian meringue which tastes a lot like marshmallow fluff.
Baked Alaska is often made with sponge cake or Christmas pudding (fruit cake.)
Is Baked Alaska Vegan?
Baked Alaska is normally full of dairy-based ice cream and egg-based meringue but this retro dessert was easy enough to veganize. Dairy-free ice cream is available in most grocery stores these days. And hats off to you if you want to go the extra mile and make your own from scratch! I have a Strawberry Rhubarb Sorbet recipe I’m excited to try in the center of my next baked Alaska!
This baked Alaska recipe is made with a tender and delicious vegan vanilla cake. The vegan meringue is made from the water chickpeas are cooked in and somehow ends up tasting like marshmallow!

How to Serve Vegan Baked Alaska
Baked Alaska is the total package type of dessert. No need for extra sauces or even garnishes! Bring it out of the freezer at serving time. For obvious reasons, it’s not the kind of dessert that can be left out even though it’s tempting to show it off as much as possible.
To slice into this frozen vegan dessert, have a tall glass of hot water ready with a clean dry cloth and a sharp knife. Dip the knife into the hot water for a few seconds, wipe dry with the cloth and then make your first cut. For clean slices, dip the and wipe the knife for each cut you make.
I served this vegan baked Alaska on a gorgeous marble cake stand from Williams-Sonoma Canada. With its classic, neutral styling, it’s perfect for cakes but I found it to be extra special for this frozen vegan dessert. The base of the stand comes off so I was able to store the baked Alaska in the freezer without being over height. Marble has a high thermal mass and holds its temperature really well. This means that the ice cream will melt more slowly once removed from the freezer because it’s sitting on something ice cold.
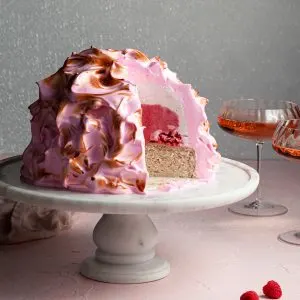
And because this is a festive vegan dessert perfect for the holidays and New Years, it’s served here with matching rosé in the prettiest antique looking coupe glasses.


How to Make Vegan Baked Alaska
- Lightly soften your ice cream. It should be just barely spreadable.
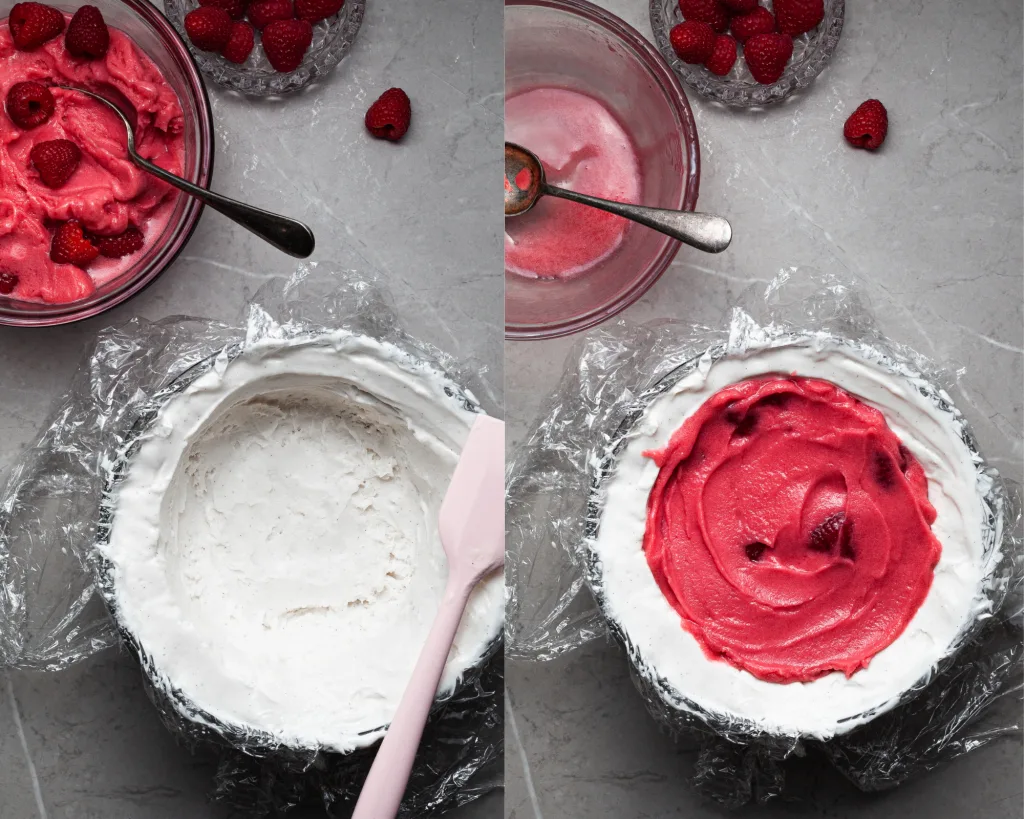
- Line a bowl with cling wrap and fill with the ice cream. Spread it up the sides so that a cavity remains in the middle. Freeze.
- Soften the sorbet, mix in the raspberries and scoop into the ice cream cavity. Return to the middle or back of the freezer overnight, up to a month. Place the bombe further back in the freezer where it’s colder.
- Bake the vanilla sponge cake, cool and then wrap and freeze.
- Unwrap the ice cream dome, place the frozen cake over the top. Trim if necessary, using the bowl as a guide. Invert over a cake disc or serving plate. Cover with wrap and return to the freezer.
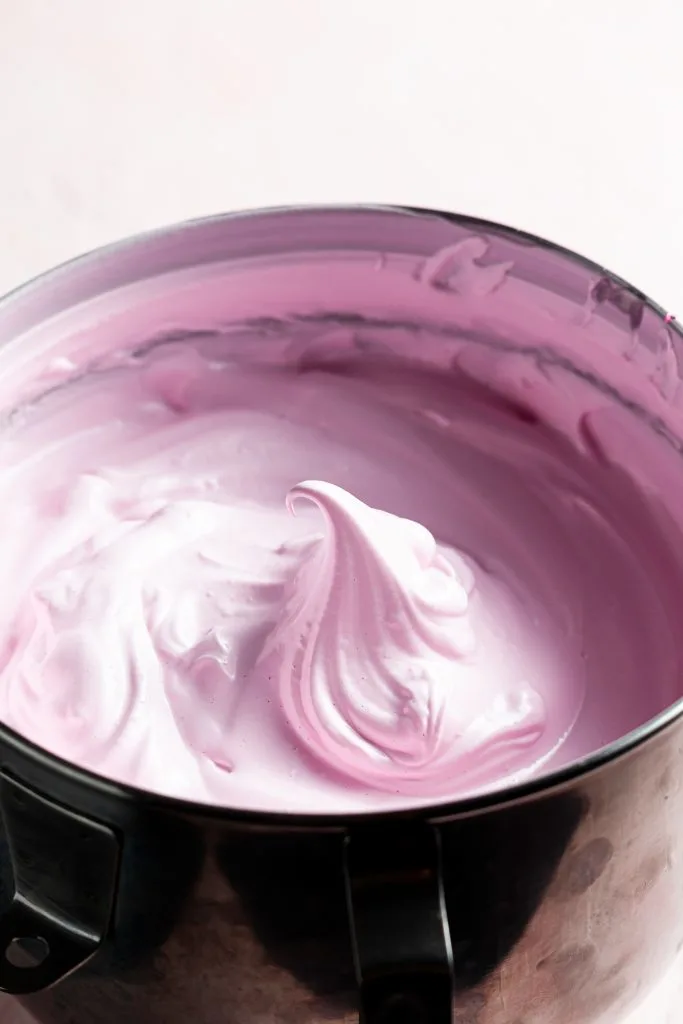
- Whip the aquafaba and cream of tarter in a stand mixer with a balloon whisk. You can also use a hand-mixer and large bowl although this will take longer. Trickle in hot sugar syrup. Whip until the temperature of the meringue is nearly room temperature. Chill.
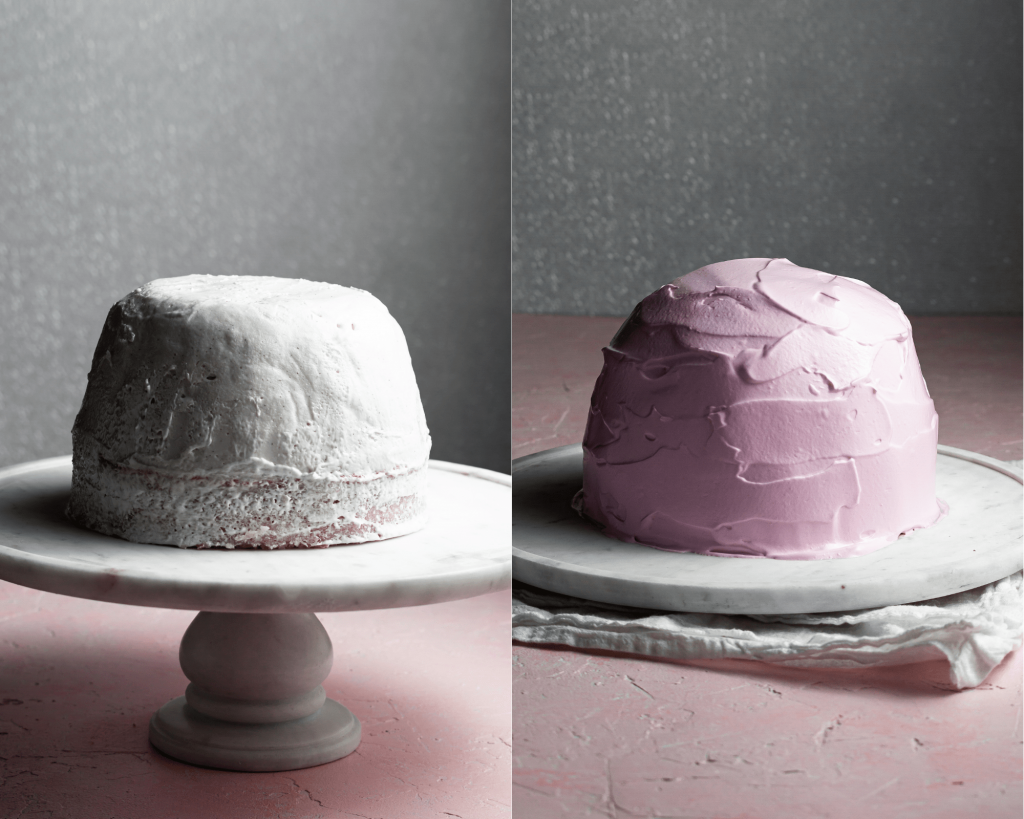
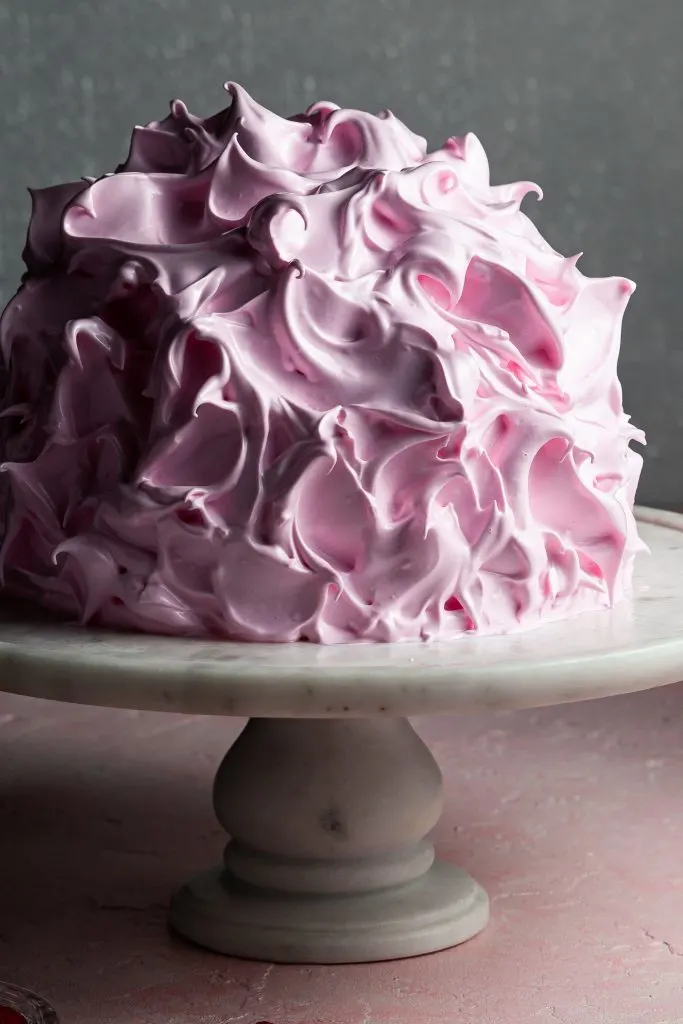
- Spread or pipe the meringue onto the ice cream dome. making sure none of the ice cream is peeking through.
- Use a kitchen torch to toast the meringue and serve!

While this showstopper vegan dessert recipe is actually really easy to make, don’t cut corners with freezing time. Make sure your ice cream is rock hard especially if you’re using high fat ice cream. It melts much faster than the foamy-chewy types which eerily enough don’t seem to ever melt. We need the ice cream to be as frozen as possible so that it doesn’t start melting while you’re applying the meringue. If the ice cream isn’t completely solid and starts to melt, the meringue is going to slip right off the ice cream.

How to Make Vegan Italian Meringue
Traditional meringue is made out of egg-whites. For a vegan version, the unassuming water chickpeas are cooked in makes an amazing substitute! This water is called aquafaba and, before I lose you, you won’t be able to taste chickpeas in the meringue. Once whipped and sweetened, you’ll be able to taste the vanilla we’re adding so it’s a bit like marshmallow fluff. I’ve had so much fun in the kitchen experimenting with aquafaba. From macarons, to meringue cookies, to brookies and to yule logs all with excellent results!


I like vegan Italian meringue for baked Alaskas because it’s silkier and is more stable than regular vegan meringue. Vegan Italian meringue is made by whipping hot sugar syrup into whipped aquafaba. I tested this recipe with the super stable meringue I created for my Vegan Lemon Meringue Cheesecake. Unfortunately, it becomes to firm too quickly when applied to ice cream. It firms up as soon as it comes in contact with the ice cream and won’t spread. So while it’s perfect for many other treats or the top of frozen treats, it just didn’t work for a full size baked Alaska.


Is Vegan Baked Alaska Gluten-Free?
If you’d like it to be, yes! The meringue is naturally gluten-free. Select a gluten-free ice cream and/or sorbet. Use a 1:1 gluten-free all-purpose flour blend (containing xanthan gum) in the vanilla sponge recipe.
How Long Will Baked Alaska Last?
This is a great dessert to make ahead of time. The ice cream dome and cake will keep well tightly wrapped in the freezer for a month or so. The meringue can also be applied to the ice cream dome and then frozen . It’ll last a couple of days in the freezer (depending on what you have in there) until it starts absorbing freezer odor. It won’t be possible to wrap the meringue without damaging it so it will be vulnerable. You can torch the meringue before putting it in the freezer, but it’s pretty fun to do at serving time.
More Showstopper Vegan Desserts:
- Vegan Pumpkin Roll
- Vegan Rum Cake
- Vegan Vanilla Layer Cake with Berry Filling
- Chocolate Orange Truffle Tart
- Vegan Chocolate Yule Log
If you make this Vegan Baked Alaska, please give it a rating in the recipe card and leave a comment below! Follow along on Instagram where you can tag me in your creations using my recipes! You can also follow me on Pinterest for vegan recipe inspiration and on Facebook. Thank you for reading!

Vegan Baked Alaska
Ingredients
For the Ice Cream Dome:
- 4 cups vegan vanilla ice cream
- 2 cups vegan raspberry sorbet
- ½ cup raspberries
For the Vegan Vanilla Sponge Cake:
- 1 ½ cups all-purpose flour
- 1 cup granulated sugar
- 2 tbsp cornstarch
- 1 ½ tsp baking powder
- ½ tsp baking soda
- ½ tsp salt
- 1 cup plant-based milk (I use soy milk)
- ⅓ cup neutral oil (eg. grapeseed, canola, sunflower etc)
- 2 tbsp distilled white vinegar
- 1 tbsp vanilla extract (clear if possible)
For the Vegan Italian Meringue:
- 1 cup reduced aquafaba*, chilled
- 1 tsp Cream of Tarter
- 2 cups granulated sugar
- ⅔ cup water
- 1 tbsp vanilla extract (clear if possible)
- few drops of pink vegan gel food dye. optional (not oil based)
Instructions
For the Ice Cream Dome:
- Remove the vanilla ice cream from the freezer and soften for 10 minutes. While it softens, line a 2-3 quart bowl with plastic wrap leaving a bit of overhang to remove the ice cream later.
- Scoop the softened ice cream into the prepared bowl. Quickly spread ice cream over the bottom and up the sides of the bowl, leaving the center hollow; cover and freeze for 30 minutes.
- Remove the raspberry sorbet from the freezer and soften for 10 minutes. Scoop into a bowl and gently stir in the fresh raspberries. Remove the bowl with the vanilla ice cream from the freezer and fill the cavity with the raspberry sorbet. Cover with plastic wrap and freeze overnight, or up to a month. The front of the freezer is the warmest, so best to keep the ice cream in the back if possible.
For the Vegan Vanilla Sponge Cake:
- Preheat the oven to 350°F/177°F/gas 4 . Prepare an 8-inch (20 cm) round cake pan with non-stick baking spray and parchment paper cut into circles on the bottom.
- Sift the flour, sugar, cornstarch, baking powder, baking soda and salt together in a large mixing bowl. Whisk well to evenly combine.
- Combine the plant-based milk, oil, vinegar and vanilla extract in a medium sized bowl or large measuring glass. Whisk well to emulsify the oil and milk together.
- Once the oven has completely preheated, add the wet ingredients to the dry ingredients. Mix until combined. Pour the batter into the prepared cake pan and bake for 35-38 minutes. Don't open the oven early or your cake may collapse in the middle. The cake is done once it pulls from the sides, and a toothpick inserted into the middle comes out clean or with a few cooked crumbs.
- Cool the cake for 10 minutes on a rack. Gently run a sharp knife along the sides of the cakes to loosen any bits that are stuck. Gently and evenly turn the pan over on a wire cooling rack. Remove the pan. Once completely cooled, gently wrap in plastic and place in the freezer.
For the Vegan Italian Meringue:
- Prepare your stand-mixer bowl and balloon whisk (or large bowl and hand mixer beaters) by wiping them down with white vinegar to remove any fat residue. The smallest amount of fat or oil will prevent the meringue from whipping fully.
- Pour the chilled, reduced aquafaba and Cream of Tarter into the bowl, and whisk on high for about 5-10 minutes, or until stiff peaks form. The meringue has reached stiff peaks if it holds its shape when the whisk is turned upside down and the meringue peak remains upright.
- Wipe down a clean small pot, whisk and candy thermometer with vinegar. Place the sugar and water the pot over medium-high heat, gently whisking only to combine the sugar evenly with the water. Do not stir afterwards. Bring to a boil, then reduce the heat to a simmer taking care not to boil it over. Using a candy thermometer, bring the mixture to soft-ball stage or 240°F(116°C). This may take 10-15 minutes.
- Once soft-ball stage is reached, add in the vanilla extract taking care not to get burned as the mixture will sputter. Add in any food dye you wish to use. With the stand-mixer running, carefully and very slowly pour the hot syrup into the whipped aquafaba. If you add it too fast the meringue will deflate and you may get flicked with hot syrup. Keep whipping on high until the temperature comes down to just above room temperature. Chill for 10-15 minutes or until cold. The meringue will keep for a couple of days in the fridge at this point. If not using it straight away, whip it again before applying it to the ice cream dome.
To Assemble:
- Remove the bowl of ice cream from the freezer. Peel off the plastic and place cake layer on the top. Cover with plastic wrap and place back in the freezer. To freeze at 30 minutes.
- Remove the ice cream and cake from the freezer. Remove from the bowl and place on a serving plate or cake disc if serving on a cake stand that won’t fit in the freezer.
- Spread the meringue over the ice cream and cake ensuring there are no gaps. Create peaks and crevices with the back of a spoon or offset spatula. If you prefer to pipe the meringue on for more texture, spread a layer of meringue on the dome first to seal it in then return it to the freezer every minutes depending on how long it takes you to pipe. Toast the meringue with a kitchen torch, and serve immediately, or place in the freezer (unwrapped for up to a few days before it absorbs odors) until serving.
- To serve, use a large, sharp chef knife. Have a tall glass or cup filled with very hot water. Dip the knife in the water to heat, wipe off the water with a clean dish towel, and slice. Dip the knife back into the water as necessary – this helps create clean cuts.
Nutrition Info:
Notes:
The Nutrition Information is only an estimate. The accuracy of the Nutrition Information for any recipe on this site cannot be guaranteed.
This post may contain affiliate links which means if you click on the link and make a purchase, I may get a very small percentage in commission. There’s never any extra cost to you, and I only link to products I actually use and enjoy. Thank you for your support!
Monika
Monday 7th of November 2022
Sorry - meant to ask how long is the baking time and at what temperature?
Bronwyn Fraser | Crumbs & Caramel
Tuesday 8th of November 2022
Hi Monika! Thanks for your interest in this recipe! I recommend using a kitchen torch on the meringue peaks for that pretty toasted look (and taste), rather than baking it. The meringue can be eaten without baking (being egg-free, it’s safe to do so), and will have a lovely glossy look. If you don’t have a kitchen torch, you can (completely) preheat your oven to 500°F/260°C/gas mark 10. Bake the Alaska for 2-4 minutes until lightly toasted, but keep a sharp eye on it. Hope you have fun with vegan glace au four! ~ Bronwyn
Monika
Monday 7th of November 2022
Very excited to find a vegan version of what we call glace au four. I read it through and I'm missing the crucial last step - how long is the assembled cake baked and for how long? Otherwise I'll be sitting with raw meringue surely?
Bronwyn Fraser | Crumbs & Caramel
Tuesday 8th of November 2022
Hi Monika! Thanks for your interest in this recipe! I recommend using a kitchen torch on the meringue peaks for that pretty toasted look (and taste), rather than baking it. The meringue can be eaten without baking (being egg-free, it's safe to do so), and will have a lovely glossy look. If you don't have a kitchen torch, you can (completely) preheat your oven to 500°F/260°C/gas mark 10. Bake the Alaska for 2-4 minutes until lightly toasted, but keep a sharp eye on it. Hope you have fun with vegan glace au four! ~ Bronwyn
Maggie
Wednesday 15th of September 2021
How do you allow the cake to thaw without the ice cream melting?
Crumbs & Caramel
Thursday 16th of September 2021
Hi Maggie, Baked Alaska cannot be thawed - everything remains frozen (the cake and the ice cream). It's a unique dessert that's delicious and so much fun! Hope you enjoy it if you try it! ~ Bronwyn