
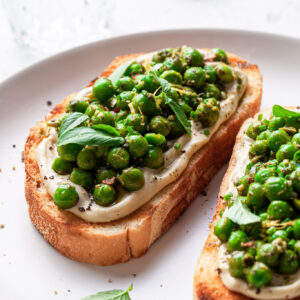
Crisp toast slathered with whipped dairy-free ricotta and topped with vibrant sweet green peas lightly sautéed in basil pesto. These vegan pesto ricotta toasts are as perfect for a quick and healthy handheld meal as they are for a pretty side dish for a brunch crowd!
Thank you to Stahlbush Island Farms for sponsoring this post. All opinions are my own.

These vegan tartines (fancy way to say open-faced sandwiches) are made with freezer and pantry staples, and can be ready in under 15 minutes. Serve on thick seedy toasted bread for an easy high protein vegan breakfast, or on cute baguette slices for effortless canapés at your next dinner party. They are also great as a vegan appie for barbeques and picnics! Make the vegan ricotta and pesto peas ahead of time, then grill your bread outside while chatting with your guests who can assemble their own toasts!

How to Cook Frozen Peas without Boiling Them
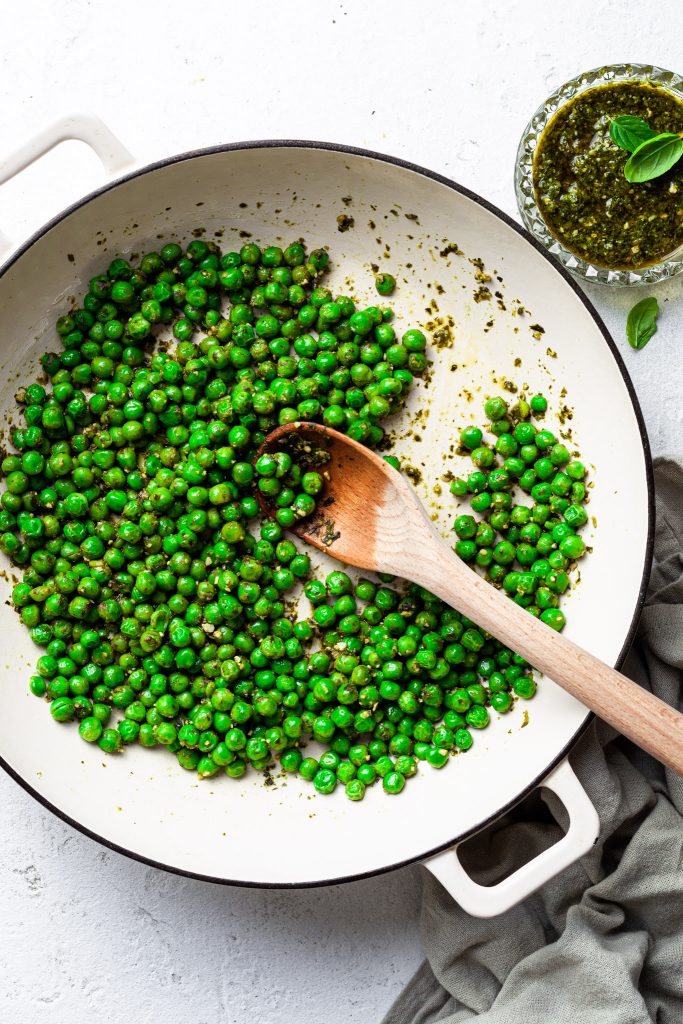
That bag of frozen peas in your freezer is secretly yearning for a more fun destiny than a dip in boiling water. While that method of cooking peas might be most common, lightly sautéing them yields more vibrant and flavorful peas. It's also faster! Adding a bit of garlicky pesto at the end of cooking compliments the sweetness of the peas, perfect for adding over creamy ricotta on toast. I used Stahlbush Island Farms frozen green peas - they are flash frozen right after harvest, locking in those fresh flavors and nutrients.
How to Make Vegan Pesto Pea Ricotta Toasts
Simple meals are the best! These tasty pea toasties come together quickly in just 4 easy steps:
- Toast the bread.
- Blend the ingredients for the creamy cashew ricotta in a food processor.
- Sauté the frozen peas, and stir in the pesto.
- Spread the ricotta on the toasts, and scoop the pesto peas over the top. Enjoy!

Feature Ingredients and Substitutions
Frozen Green Peas:
Frozen peas are readily available, convenient, and just as delicious and nutritious as fresh ones. If you're lucky enough to have a garden brimming with fresh sweet peas, you can use those in lieu of frozen ones. A word of caution though: canned peas just don't have the fresh flavor, pleasant texture, or vibrant color for these toasts.
When using frozen peas, don't defrost them. Defrosting them first will cause them them dehydrate and be more shriveled looking and less tender. To maintain their beautiful green color, don't overcook them.
If you add salt to the peas, do so once the peas are barely cooked and you've added the pesto. If you salt them too early, the peas can dehydrate and shrivel.
Pesto:
Some store-bought basil pesto is not vegan because it contains cheese. The non-dairy pesto I have found has not been labeled as vegan, so your best bet is to just read the list of ingredients.
Classic basil pesto is used in this recipe, but other green sauces or your favorite green dressing can be used instead. Chimichurri sauce would be an excellent substitute (for the recipe linked, you can leave out the avocado before mixing .)
As with the peas, don't overcook the pesto to maintain that beautiful green color. Basil pesto will begin to turn a muted green or brownish color when overcooked.
Dairy-Free Ricotta:
Whipped ricotta provides a creamy base for the pesto peas to stick to. This homemade vegan cheese adds flavor and a rich texture to the toast toppings. Blend for a couple minutes more once smooth for whipped ricotta which is satiny, the perfect bed for those herbed peas! If you'd prefer not to use a cashew-based ricotta, I also have an almond-based ricotta recipe.
There are several vegan ricotta products available in stores which can be used in lieu of making your own vegan cheese.
Looking to use something other than ricotta to top your toasts? Hummus makes a great substitute for the ricotta. Melting some vegan cheese or spreading some vegan cream cheese on the toast before adding the pesto peas is also delicious!

Bread:
An Italian, French or artisan round loaf works well for this recipe, but use which ever bread you have on hand or love most. Keep in mind that thicker slices and denser varieties are best for heavier, thicker toast toppings like soft cheese and veggies. A small baguette makes for cute appetizers. Hearty, seedy bread is great for a quick plant-based lunch. And, of course, if you want to make these toasts gluten-free, simply use your favorite gluten-free bread.
Toasting and brushing the bread with oil gives the bread some sturdiness to withstand the heavy toppings and to help prevent sogginess. Plus, the texture of crispy toast with creamy ricotta and tender green peas is amazing!
Different Ways to Toast Bread
While making toast is perhaps one of the easiest things to make, it's worth mentioning that you have a few options in how to do so. Some methods work better than others depending on how many people you're serving, if your oven is already in use, if you're barbequing, and how hands-on you care to be!
Stove-top in a Skillet, Frying Pan or Cast-Iron Grill Pan:
Brush the slices of bread lightly with olive oil and place them directly on the skillet over medium heat, flipping when golden. Repeat on the other side.
Outdoor Barbecue:
Perfect for those summer days where you're outside grilling other food like veggies. Like the stove-top version, brush the sliced bread with olive oil, place directly on the hot grill, flipping when golden. Try not to move the slices around while toasting so you get those pretty grill marks.
Oven:
Best for preparing a big batch of toast for a crowd, the oven can be used for toasting in three ways:
- Place the slices of bread on a large baking sheet. Brush both sides with olive oil. Toast in the oven preheated to 450°F/230°C/gas mark 8 for about 5-8 minutes or until lightly browned.
- Better for a big batch of large pieces of firm bread, create a giant toaster. I learned this trick on Tasting Table - preheat the oven to 450°F/230°C/gas mark 8. Place a large baking sheet on the lowest rack of your oven and then adjust the upper rack into the slot just above the bottom one. Slip the slices of lightly oiled bread between the rack's bars so that they are standing up on their edge on the baking sheet. Your oven now looks like a huge toaster inside! Toast for 4-5 minutes then check the toast; if you notice that some sides or edges are browning faster, switch or flip them around with a pair of kitchen tongs. Toast for another 4-5 minutes or until they have reached the desired toastiness. Brush lightly once toasted to prevent dripping oil from smoking during toasting.
- Preheat the oven to 450°F/230°C/gas mark 8. Place the slices of bread directly on the oven rack for 5-8 minutes. Brush with oil once they are toasted so the oil does not drip onto the bottom of the oven.
Classic Pop-up Toaster or Toaster Oven
No need for instructions, this a great option when serving 1-2 people. It's worth mentioning that if using a pop-up toaster, the bread should not be brushed with oil before toasting because the oil may drip into the toaster.

Storage and Make Ahead:
Make the ricotta and pea mixture up to 3-5 days in advance. Store in a shallow airtight container in the refrigerator. Assemble the toasts just before serving so they don't become soggy. The peas are delicious warm or cold.
Freezing:
The pesto peas and and the cashew ricotta can be stored separately in airtight containers and frozen for approximately 6 months. Thaw in refrigerator overnight. To restore the creamy texture of the cashew cheese, blend in a food processor until it reaches the desired consistency.
More Vegan Light Meals and Sides
- Grilled Vegetables with Avocado Chimichurri Sauce
- Cauliflower Gyros
- Asparagus and Pesto Cashew Cheese Tart with Lemony Arugula
- Crispy Smashed Potatoes
If you make these vegan Pesto Pea Ricotta Toasts, please give them a rating in the recipe card and leave a comment below! Follow along on Instagram where you can tag me in your creations using my recipes! You can also follow me on Pinterest for vegan recipe inspiration and on Facebook. Thank you for reading!
Vegan Pesto Pea Ricotta Toasts
Recipe Video
Ingredients
- 1 loaf of Italian, French, round artisan or baguette style bread use gluten-free bread if desired
- olive oil for brushing the bread
Pesto Green Peas
- 1 tablespoon extra virgin olive oil
- 2 ¼ cups frozen green peas (do not defrost)
- ¼ cup vegan basil pesto
Savory Cashew Ricotta
- 1 cup cashews (soaked 4 hours or see quick soak method in notes)
- ½ cup unsweetened vegan yogurt
- 1 tablespoon extra-virgin olive oil
- 1 tablespoon nutritional yeast, optional (or finely grated vegan Parmesan, to taste)
- 2 tablespoon lemon juice
- grated zest from half of a lemon
- ½ teaspoon salt
- ½ teaspoon ground black pepper, or to taste
Garnishes, Optional
- minced chives
- grated lemon zest
- flaky sea salt (such as Maldon)
Instructions
- Brush the slices of bread lightly with olive oil and place them directly on the grill pan or skillet over medium heat, flipping when golden (about a minute) and repeating on the other side. See blog post for other toasting options, including toasting a big batch in the oven, on the barbeque and, of course, pop-up or toaster oven.
- Drain the cashews and transfer to food processor with the rest of the ingredients for the ricotta. Blend until almost smooth and whipped, scraping down the sides as you go. Adjust salt and pepper to taste.
- Preheat the olive oil in large skillet over medium heat. Add the peas, and sauté them just until they become vibrant. Stir in the pesto (heating through if the pesto requires cooking - check the instructions on the label), and remove from the heat. Don't overcook so the peas and pesto remain vibrant.
- Spread a thick layer of vegan ricotta on top of each slice of toast. Spoon the peas onto each toast, pressing lightly so that most of the peas stick to the cashew ricotta. Sprinkle with the garnishes if desired. Serve immediately. See Notes below for storing leftovers.
Nutrition Info:
Notes:
The Nutrition Information is only an estimate. The accuracy of the Nutrition Information for any recipe on this site cannot be guaranteed.
Post may contain affiliate links which means if you click on the link and make a purchase, I may make a very small percentage in commission on qualifying purchases. There's never any extra cost to you, and I only link to products I actually use and enjoy. Thank you for your support!

Leave a Reply