
This tender, moist vegan vanilla layer cake is filled with tart berry curd and fluffy vanilla frosting. Top with fresh berries for a simple but elegant dessert! Easy to make and decorate, it's perfect for any occasion from backyard get-togethers, birthdays or any other time you need a delicious layer cake!
Thank you to Stahlbush Island Farms for sponsoring this post. As always, all opinions are my own.
How to Make a Vegan Berry Vanilla Layer Cake
We start with an easy, fluffy vanilla white cake. Simply whisk together the dry ingredients in one bowl, the wet ingredients in another, then stir them together. The ingredients are straight forward - basic pantry staples and no unfamiliar ingredients!
It's actually pretty easy to create a tender moist cake crumb that is is dairy-free and egg-free. After a lot of experimenting, I don't find it necessary to use a store-bought egg-replacer. By using a combination of baking powder, baking soda, vinegar and a bit of cornstarch, you won't miss the leavening or binding power of eggs at all. And no, you won't taste vinegar! We use just enough to react with the baking soda and to curdle the dairy-free milk to make a vegan buttermilk.
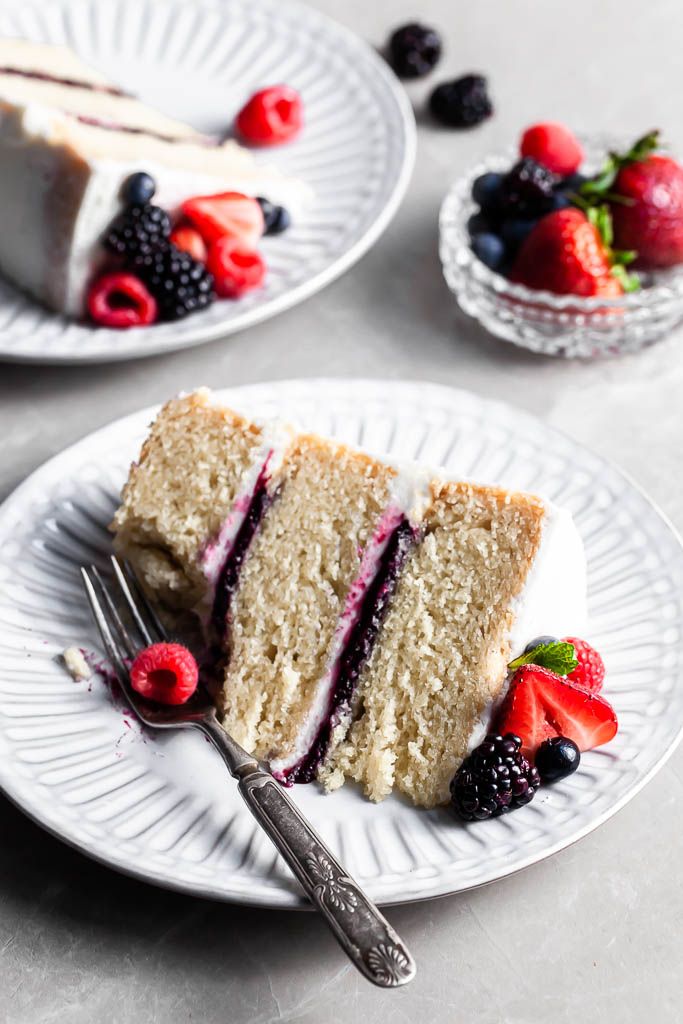
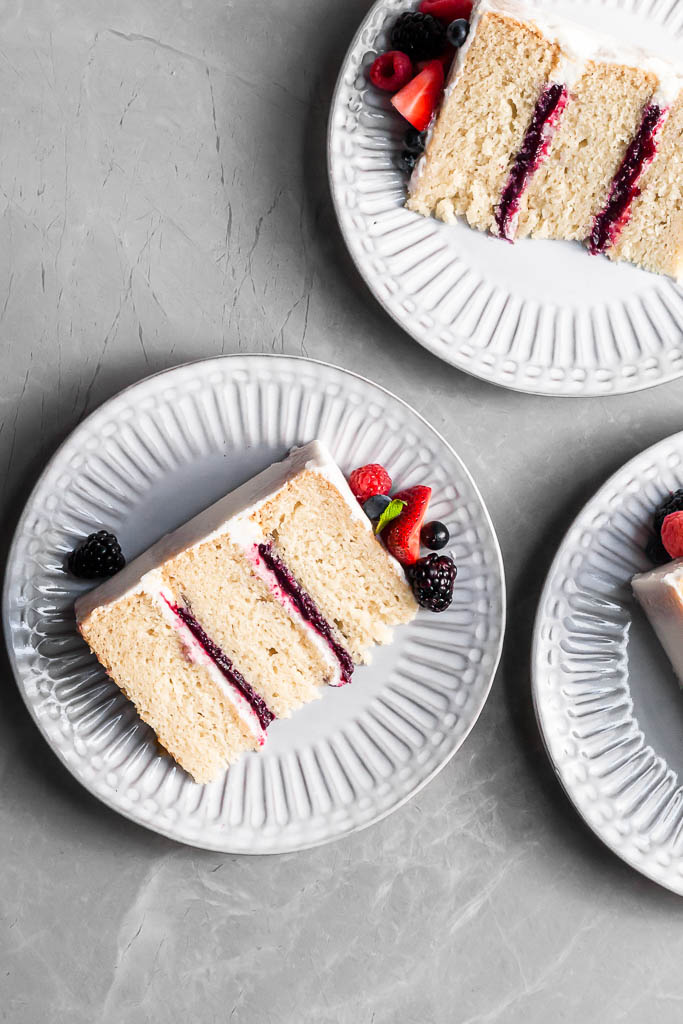
Next we have the star of this beautiful vegan summer dessert: the jewel toned mixed berry filling. While some recipes use jam, it can be exceedingly sweet when added in between the layers of a frosted cake. This thick berry curd is heavy on fruit flavor, and is the perfect balance of sweet and tart.
I used Stahlbush Island Farms frozen Northwest Berry Blend which is a variety of the best summer berries - strawberries, blueberries, blackberries and raspberries. The berries are cooked down so they release their juices, sweetened, and thickened with cornstarch. Add a little lemon juice for some zip, strain the seeds out and then chill it. It will continue to thicken and the flavors intensify as it cools. You'll be left a luscious, smooth fruit filling which is perfect for cake layering, filling cupcakes and more! If this product is not available where you live, you may choose to use a blend of frozen strawberries, blueberries, raspberries and blackberries, or even one type of berry would work. Fresh berries will also work in this recipe.


The third component for this vegan layer cake is the fluffy vanilla frosting. I like using a combination of vegan butter and shortening for my American style vegan buttercream. The vegan butter gives a nice buttery flavor and the shortening helps stabilize the frosting as it doesn't melt as easily. If you can find it, clear vanilla extract is a wonderful addition to ensure a whiter frosting.
These is enough frosting for this cake to be crumb coated and given a final thicker layer if you like. I chose to go with a naked cake look - it's basically just a crumb coat so you can still see the cake peeking through. This reduces the amount of icing used and therefore how sweet the cake is. I love the casual but classy look of naked cakes, which makes them perfect for easy celebrations. Effortless and elegant looking is hard to beat!
How to Assemble a Layer Cake with Curd and Frosting:
1 - I recommend chilling your cake layers before leveling and assembling the cake. This makes the cake much easier to work with as a chilled cake is firmer and not as sticky. Once they are room temperature after baking, wrap them in plastic wrap and place them on a tray in the fridge for about an hour.
2 - Use a large serrated knife to level the tops of each of your cake layers. I usually don't take much off, maybe ⅛". This vegan cake recipe produces cakes that don't dome too much during baking. Keep the arm you're using to cut the cake nice and tight to the side of your body is a trick to help ensure a nice straight cut. Ideally, each layer will be the same height once leveled for a nice even looking cake.
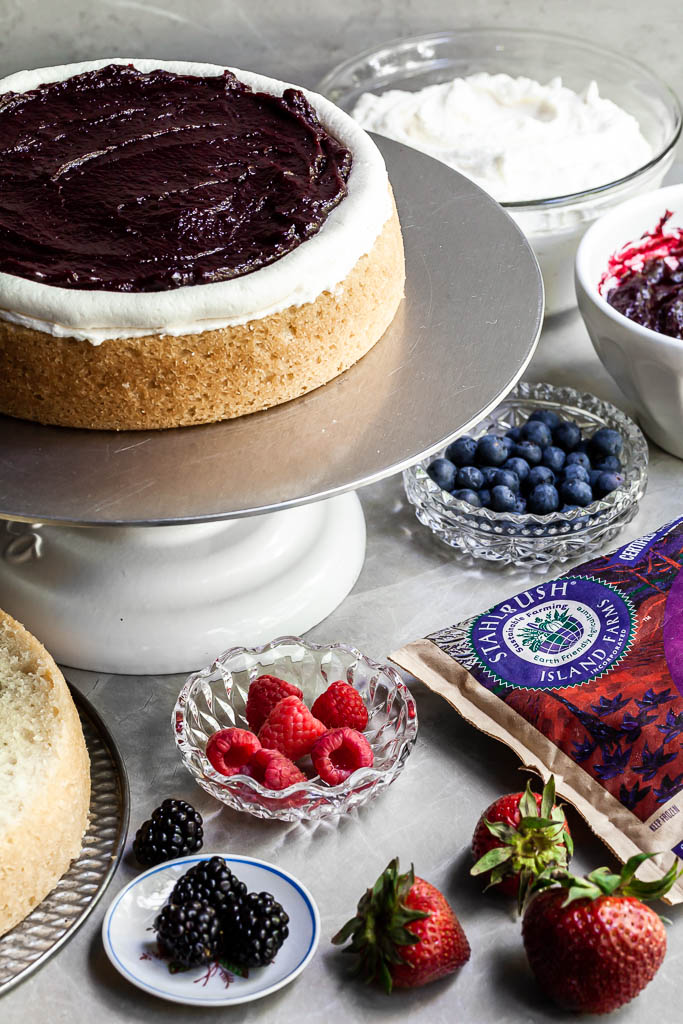
3 - Dab and spread a bit of frosting onto the middle of the cake board (or serving plate.) Then, center your first cake layer on it. Spread an even layer of frosting on the cake layer, then pipe a frosting dam along the edge using a ½" round piping tip. The frosting dam helps confine the berry curd so it doesn't slide out of the sides of the cake. Gently spread the berry curd over the top of the frosting; take care not to press in and lift any of the buttercream into the berry layer.
4 - Add the next cake layer and repeat until you have your 3 cake layers assembled with the berry curd and frosting. Smooth the frosting around the sides of the cake. If you want to add a thicker layer of frosting, chill the cake first so that the crumb coat can set up and hold those crumbs in. Once you've frosted your layer cake, you can decorate as you like. I went with an assortment of fresh berries and mint leaves for a natural, pretty look.

Cardboard cake rounds are great to set your cake up on. They allow you to decorate the cake in your work space then transfer it to your clean serving platter or plate. They aren't necessary but make the process easier and less messy. A cake turn table is also a nice tool to have if you enjoy cake decorating, and it makes frosting the cake much easier - I love mine which also serves as a casual cake stand.
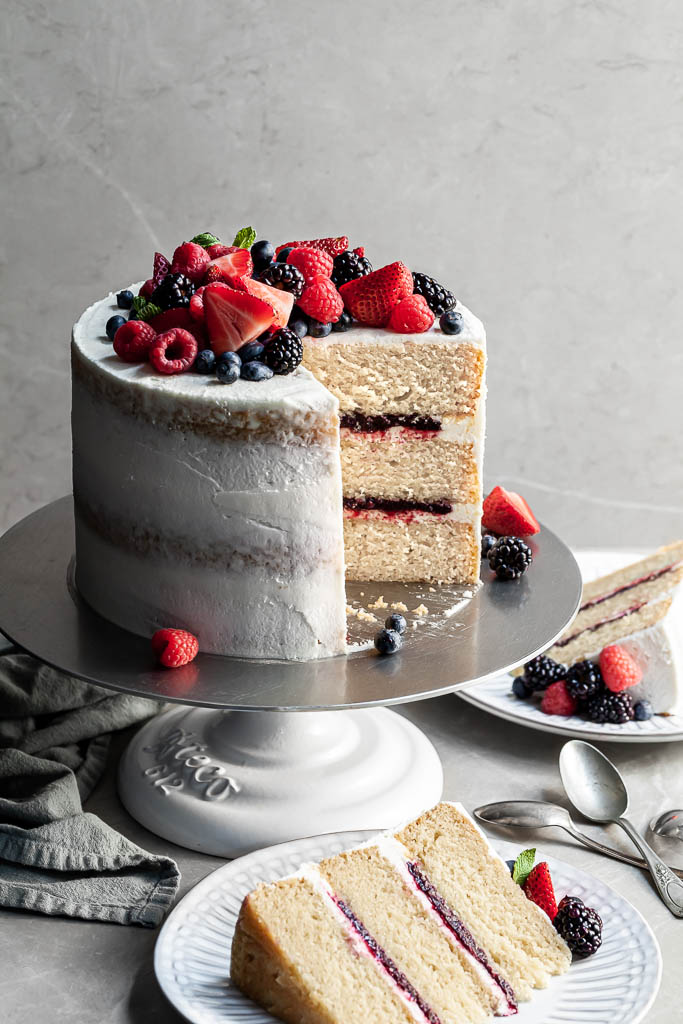
This vegan Chantilly style cake is best served at slightly cooler than room temperature. It keeps best in the fridge if you top it with fresh berries. Simply remove it from the fridge about 30 minutes before serving.
How to Make the Vegan Vanilla Berry Layer Cake Ahead of Time
This vegan layer cake can be made in advance. You can either make the whole thing and chill it, or make the components ahead of time and assemble it once you're ready to do so.
Once the cake is completely assembled, chill in the fridge to firm up, then wrap the sides and top with plastic wrap. This is important for naked cakes as the fridge will strip the cake of its moisture without a thicker layer of frosting to seal it. If you choose to add a thicker layer of frosting once the cake is crumb coated, the cake does not need to be wrapped in plastic. The frosted layer cake will keep in the fridge for about 5 days. Garnish with fresh berries on the day you plan to serve it.
While many layer cakes can be frozen whole, a layer cake like this with curd in the middle would not freeze well. The berry curd may leach out a lot of it's moisture and ruin your cake upon thawing.
To Make the Cake Layers, Fruit Filling and Frosting Ahead of Time without Assembling:
Once the cake layers are completely cooled to room temperature, (place each one on a cake round if you have them and then) wrap in plastic wrap. The cake rounds aren't essential but they do help keep the cakes nice and flat. Place them in the fridge to chill and firm up. Once chilled, you can then stack them in an airtight bag and freeze them. They will remain fresh for about 5 days wrapped tightly in the fridge and up to a month in the freezer.
The frosting can be made and stored in a large plastic bag or airtight container for a few weeks in the fridge. You can also freeze it for up to 3 months. Bring it to room temperature before using it. The frosting will be very firm straight out of the fridge; it will tear your cake if you try spreading it while it's cold. Once the frosting is back down to room temperature, give it a good stir before assembling your cake.
The berry filling can be made ahead of time and stored in the fridge in a tightly closed jar for up to 2 weeks. Give it a good stir before assembling your cake - it will be thick like jelly. I don't recommend freezing this berry curd though, as the texture may change and thin out.

Check Out These Other Vegan Showstopper Desserts:
- Strawberry Layer Cake
- Hummingbird Bundt Cake with Vanilla Glaze
- Strawberry Galette with Chocolate Hazelnut Cream
- Chocolate Orange Truffle Tart with Candied Kumquats
- Blueberry Ginger Galette
If you make this Vegan Berry Vanilla Layer Cake, please give it a rating in the recipe card and leave a comment below! Follow along on Instagram where you can tag me in your creations using my recipes. I love seeing what you're cooking! You can also follow me on Pinterest for vegan recipe inspiration. Thank you for reading!

Vegan Berry Vanilla Layer Cake
Ingredients
For the Vanilla Cake:
- 4 ½ cups all-purpose flour
- 3 cups granulated sugar
- 6 tablespoon cornstarch
- 4 ½ teaspoon baking powder
- 1 ½ teaspoon baking soda
- 1 ½ teaspoon salt
- 3 cups plant-based milk I use soy milk
- 1 ¼ cups neutral oil eg. grapeseed, canola, sunflower etc
- 6 tablespoon distilled white vinegar
- 3 tablespoon vanilla extract (clear if possible)
For the Berry Filling:
- 20 oz frozen mixed berry blend (about 4 cups) may use fresh mixed berries
- ¾ cup granulated sugar
- 2 tablespoon lemon juice
- 4 tablespoon cornstarch
- 4 tablespoon water
For the Vanilla Frosting:
- 1 cup vegan butter, stick style, not tub style
- 1 cup vegetable shortening
- 6 cups confectioners' sugar, sifted
- 1 tablespoon vanilla extract (clear if possible)
- 2 tablespoon plant-based milk
Optional Garnishes:
- fresh berries
- fresh mint leaves
Instructions
For the Vanilla Cake:
- Preheat the oven to 350°F/177°C/gas mark 4. Prepare three 8-inch (20 cm) round cake pans with non-stick baking spray and parchment paper cut into circles on the bottom.
- Sift the flour, sugar, cornstarch, baking powder, baking soda and salt together in a large mixing bowl. Whisk well to evenly combine.
- Combine the plant-based milk, oil, vinegar and vanilla extract in a medium sized bowl or large measuring glass. Whisk well to emulsify the oil and milk together.
- Once the oven has completely preheated, add the wet ingredients to the dry ingredients. Mix until combined. Divide the batter evenly between the prepared cake pans and bake for 35-38 minutes. Don't open the oven early or your cakes may collapse in the middle. The cakes are done once they pull from the sides, and a toothpick inserted into the middle comes out clean or with a few cooked crumbs.
- Cool the cakes for 10 minutes on a rack. Gently run a sharp knife along the sides of the cakes to loosen any bits that are stuck. Gently and evenly turn the pans over on a wire cooling rack. Remove the pans. Leave the parchment on until you're ready to assemble the cake. Once completely cooled, gently wrap in plastic and store flat in the fridge.
For the Berry Filling:
- Add the frozen berries, sugar and lemon juice to a medium sized pot over medium heat. Stir the mixture until it starts to boil. Reduce the heat to low and allow the filling to simmer for 5-8 minutes. You want the berries to burst to release their juices and concentrate a bit, but you don't want it all to evaporate.
- Turn off the heat. Pour the filling into a metal sieve or strainer resting over a medium sized heat-safe bowl. Use a rubber spatula or large metal spoon to press the fruit against the mesh to get as much juice as possible out of the fruit. You'll have about ⅓-1/2 cup of seeds and berry skin - this can be composted or saved for another use like smoothies. Rinse out the pot and pour the strained berry filling back in.
- In a small bowl, whisk the cornstarch and water together to make a slurry. Stir until the cornstarch is completely dissolved - any starch that is not dissolved will make lumps in your filling.
- Whisk the cornstarch slurry into the fruit filling. Turn the heat on to medium. Whisk constanty to prevent burning and lumps from forming. Once the filling is simmering, reduce the heat to low until the mixture begins to thicken. Cook one more minute once it has thickened. Remove from heat and pour the berry filling into a bowl. Place a sheet of plastic wrap directly onto the hot fruit filling to prevent a skin from forming. Refrigerate for at least 2 hours or until completely chilled.
For the Vanilla Frosting:
- In a stand-mixer with a balloon whisk (or with a large bowl and beaters), beat the vegan butter and shortening together until smooth. Add in the sifted confectioner's sugar, one cup at a time. Beat for 3-4 minutes, scraping down the sides as needed.
- Add in the vanilla extract and beat another minute. Add the plant-based milk 1 teaspoon at a time beating well each time. The frosting should be smooth and pipeable but not so soft that it slumps. If you add too much milk, you can add more sifted confectioner's sugar a few tablespoons at a time but this naturally will make the frosting sweeter.
To Assemble the Berry Vanilla Cake:
- Start with completely chilled cakes so they are firm. Use a large serrated knife to level the tops of each of your cake layers, removing about ⅛-inch or so. Ideally, each layer will be the same height once leveled for a nice even looking cake.
- Spread a bit of frosting onto the middle of the cake board (or serving plate) and then center your first layer on it. Spread about ¾ cup of frosting evenly over the cake, then pipe a frosting dam along the edge to held in the berry curd using an approximately ½" (1.25 cm) round tip. Gently spread about ½ cup of the berry curd over the top of the frosting, taking care not to press in and lift any of the buttercream into the berry layer.
- Add the next cake layer and repeat until you have your 3 cake layers assembled with the berry layer and frosting. Smooth a thin layer of frosting on the top and around the sides of the cake. Top with an assortment of fresh berries and mint leaves, if desired. The cake is best served at slightly cooler than room temperature but stores best in the fridge considering it's topped with berries. Simply remove it from the fridge about 30 minutes before serving.
Nutrition Info:
Notes:
The Nutrition Information is only an estimate. The accuracy of the Nutrition Information for any recipe on this site cannot be guaranteed.
Post may contain affiliate links which means if you click on the link and make a purchase, I may make a very small percentage in commission on qualifying purchases. There's never any extra cost to you, and I only link to products I actually use and enjoy. Thank you for your support!
Bakingo says
Thanks for sharing the Vegan Berry Vanilla Layer Cake Recipe. I will try to make this at home.
Jennifer L Gonzalez says
My cake came out moist and delicious. I leveled the cake and was going to freeze the tops to use for cake pops later. I just took a couple pieces and put them in the air fryer and drizzled it in honey. It was so good. The air fryer gave the top the crispiness it needed just like when it first comes out of the oven.
Crumbs & Caramel says
I'm so happy you enjoyed the cake, Jennifer! I love the idea of popping frozen leftovers into the air fryer, yum. Thank you for sharing! ~ Bronwyn
Des says
This cake looks perfect, except I’m not super into vanilla flavour so I’m hesitant to add three whole tablespoons of the extract to a cake. Do you think it would turn out well if I replace the vanilla with lemon juice? Or maybe lemon extract? Thanks!
Crumbs & Caramel says
Hi Des!
Thanks for your interest in the cake!
Indeed, this is a true 'vanilla' cake compared with a yellow or white cake. If you'd like more of a mild lemon cake, I'd try 1/2 teaspoon of lemon extract, reduce the vanilla to 1 teaspoon (for depth of flavor but leave it out altogether if you really don't like vanilla at all), 1 tablespoon of fine lemon zest and substitute 4 tablespoons of the vinegar with lemon juice. I haven't tested those suggestions but hope you enjoy the cake! Stay tuned for a lemon cake on the blog!
Thanks again,
~ Bronwyn
Des says
Thanks Bronwyn! I'll try it as you suggested. I guess the thing I was worried about was wether the extra liquid left out with the vanilla extract would mess up the ratio noticably, so I'm glad to see your suggestions. I'm certainly not an expert in baking!
Erin Garbin says
Hi! Do you sift the sugar before or after you measure? Thanks!
Crumbs & Caramel says
Hi Erin! I sift the sugar once measured/weighted - sifting removes any small lumps if there are any. Hope you enjoy the cake! ~ Bronwyn
Ellie says
Just wanted to leave a note to say that I was really pleased with this recipe and the cake it produced! I used this recipe as a standard but infused the milk with lavender, brushed it with a lavender syrup and added blackberry jam to make a hedgerow type cake/flavour. It was really successful but I would have been lost without using this recipe as a basis to explore new flavours, thank you!
Crumbs & Caramel says
Hi Ellie! Thanks so much for the feedback! I'm delighted you enjoyed the recipe. I love your flavor additions, sounds amazing! ~ Bronwyn
Hannah Guerrero says
Can you use almond milk?
Crumbs & Caramel says
Hi Hannah, yes almond milk works! Enjoy the cake! ~ Bronwyn
Hannah Guerrero says
Thank u
Juliette Piat says
Hi Bronwyn, I am planning on making this cake for a baby shower. Can I make it in 2 9inch pans? Also can I use gluten-free flour? Thanks for your help. 🙂
Crumbs & Caramel says
Hi Juliette, yes you can make the cake in two 9" round cake pans - you may have some excess batter depending on how deep your cake pans are. Just make sure you leave room for the cakes to rise so they don't overflow the pans (about 2/3 full). If you have too much batter, you could make a few cupcakes for yourself 😉 Baking time will also be a little longer - I'd estimate 40-45 minutes. And yes, Bob's Red Mill Gluten-Free Blend 1:1 (the blue bag) is a good one! If you're using another brand, I'd avoid any 1:1 gluten-free flour blends that have chickpea flour in them and ensure that there's some xanthan gum in there for binding. Enjoy the baby shower! ~ Bronwyn
Teresa says
This was so easy and delicious! Everyone had lots of compliments and several people requested seconds. The only change that I made to the recipe was to use 5 cups of powdered sugar for the frosting instead of 6. I usually alter recipes a lot, but this was perfect!
Crumbs & Caramel says
Hi Teresa! I'm so happy that you and your crew enjoyed the cake so much! Thank you so much for taking the time to let me know 🙂 ~ Bronwyn
Gianna says
Thank you for your help and suggestions..
They are so helpful! I will send a photo to you. - G
Kathryn says
Hi there! I plan to make this cake tomorrow. If I halve this recipe, would it be ok for two 7” pans? I only need a small cake for my little girl. Thank you!
Crumbs & Caramel says
Hi Kathryn! I think you're right - if we look at this cake conversion chart (https://www.joyofbaking.com/PanSizes.html), it looks like 3 x 8" cakes is about 18 cups and 2 x 7" round pans would be roughly 10 cups. The layers may not be quite as tall where it's a little more than half the batter you'd need for the same height. The baking time will be a little shorter too, I'd check around 28 minutes but not open the oven any sooner as it may deflate/sink not set up enough. Hope your little girl loves it! ~ Bronwyn
Gianna says
Good Morning, I made a test cake of this cake. It is amazing! I wondered, will it travel well if I fully assemble it. I am transporting it 45 minutes for a wedding. Would it be best for me to assemble the cake at the venue? I am concerned about traveling with a three layer cake with berry curd in between layers.
Crumbs & Caramel says
Hi Gianna! I'm so happy you enjoyed the cake and are making it again for a wedding! I'm pretty low risk when it comes to decisions like this and assembled my own wedding cake at the venue the night before and it didn't have a filling. However, if you look into it and it's not possible (timing won't work, they don't have a fridge, etc), I think if you chilled the whole thing really well for a good 8 hours before leaving (and use the block style vegan butter and shortening), keep the air-conditioning on in your vehicle, have it really well positioned and flat, etc that it should be okay. If you do make it ahead of time, I'd reinforce it with large straws or dowels before doing the final decorating which help keep it perfectly upright despite what the filling may want to do when there are bumps in the road or sudden stops. You could also bring a small repair kit (extra frosting, offset spatula etc) with you for any touch ups. I'd love to see the cake once you make it! Hope this helps ~ Bronwyn
Autumn says
Loved this recipe! Made this cake for my brother in laws wedding! It was such a hit I am going to make it again for his wife's baby shower!
Have you ever made this batter into cupcakes?
Carla says
Hi so I just made my cake I haven’t assembled it but it taste a bit eggy which is clearly rlly weird since it’s a vegan cake
Crumbs & Caramel says
Hi Carla! I'm not sure why it would be eggy? Before I went vegan I really disliked eggs - I've not experienced this flavor with this recipe. Eggs have a sulfurous flavor so perhaps one of the ingredients you're using is off? If you're using gluten-free flour which has garbanzo flour in it, it can have a strong flavor. Some brands of soy milk can also have a slight sulfurous flavor. Hope you enjoy it all the same, once frosted! ~ Bronwyn
Clare Justinne Ferniz says
hi, what other alternatives can i use for distilled white vinegar?
Crumbs & Caramel says
Hi Clare! You can use apple cider vinegar if you don't have white vinegar. Hope you enjoy the cake! ~ Bronwyn
ronak mehta says
I tried out a cake with the above recipe. The cake was very soft and tasty. Thank you.
Crumbs & Caramel says
Hi Ronak, Thanks so much for the great feedback! I'm so happy you enjoyed the cake! ~Bronwyn