
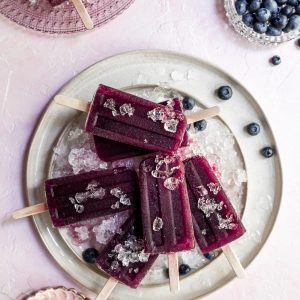
Blueberry popsicles with a delicious and refreshing Earl Grey tea twist! Made with only a handful of ingredients, these dairy-free frozen treats are easy to make and perfect for hot summer days!

Thank you to Stahlbush Island Farms for sponsoring this post. As always, all opinions are my own.
Loaded with blueberries, these ice pops are an upgrade to a tall glass of iced sweet tea. There's just something irresistible about food served on a stick!
If you haven't had Earl Grey tea before, it's a black tea flavored with bergamot oil which is a citrus oil. Bergamot oranges smell citrusy but have a more floral and distinct scent. It's uplifting and adds a bit of sophistication to these blueberry popsicles.
I used Stahlbush Island Farms' Blueberries - they're big, juicy and perfectly ripened.

While these aren't like the Kool-Aid popsicles from 80's, they still appeal to all ages. My kids go crazy for these ice lollies as much as grown-ups appreciate the dressed up flavor. These popsicles are made by steeping Earl Grey tea so if you'd like to avoid the caffeine normally in tea, you can use a decaffeinated Earl Grey tea.
These popsicles taste lovely with just the flavors of the blueberries and tea but I couldn't resist adding in some vanilla. If you've had an Earl Grey latte (a London Fog), then you know what I mean. Earl Grey lattes are made by combining a sweetened Earl Grey tea with steamed milk and vanilla. The vanilla takes the tea to the next level of yum, and does the same for these Earl Grey Blueberry popsicles, too!
You'll notice that I also add a pinch of salt to these popsicles. It's not necessary but I find it really helps balance the flavors. That said, the salt itself isn't something that stands out at all in the taste - no salt lick here! 😉
Lemon juice is a common ingredient in fruit or berry popsicles. The acidity helps highlight the flavors. I didn't use any lemon juice in this recipe because we're already getting some citrus flavor from the Earl Grey tea.

How to Make Blueberry Earl Grey Popsicles:
- Simmer the blueberries in water and sugar until they burst, about 2 minutes.
- Steep the Earl Grey tea in the blueberries and their juices, then cool.
- Press the mixture through a fine mesh sieve so the blueberries release their juices.
- Add the vanilla, pour into popsicle molds and freeze. Done!

How to Make Smooth Berry Popsicles:
When testing this recipe, I tried blending the fruit so all of it ended up in the popsicles. We found that they had some grittiness to them, likely from the tiny blueberry seeds. This was not a deal breaker, but for a completely smooth fruit popsicle, I found that cooking the blueberries and then pressing them in a sieve yielded the best results. The popsicles had all of the flavor and color from the blueberry juices but none of the grittiness with minimal effort.

How to Store Homemade Popsicles:
While you can keep your popsicles in the mold once frozen, you may wish to have your freezer space back. I love my popsicle mold but like most molds, it takes up valuable freezer space. The other benefit to not storing the popsicles in the mold is not having to run hot water over them each time you want one.
So what's the alternative? First, remove the popsicles from the mold. If the popsicles are hard to remove, run hot water over the sides of the molds for 10 to 15 seconds being careful not to run water over the exposed parts of the actual popsicles. The popsicles should then slide out when pulled gently. Then place them on a large baking sheet. Put them back in the freezer for about 15 minutes and then place them in a freezer friendly bag or container.

More Dairy-Free Frozen Treats:
- Vegan Fudgesicles
- Strawberry Rhubarb Sorbet
- Vegan Strawberry Rhubarb Crumble Ice Cream
- Vegan Mango Lassi Popsicles
If you make these vegan Blueberry Earl Grey Popsicles, please give them a rating in the recipe card and leave a comment below! Follow along on Instagram where you can tag me in your creations using my recipes, I love seeing what you're cooking! You can also follow me on Pinterest for vegan recipe inspiration and on Facebook. Thank you for reading!
Blueberry Earl Grey Popsicles
Ingredients
- 2 cups water
- 2 cups frozen blueberries (can use fresh blueberries)
- ½ cup granulated sugar
- 2 Earl Grey tea bags (use decaffeinated if desired)
- 1 teaspoon vanilla extract
- ⅛ tsp salt
Instructions
- Combine the blueberries, water, sugar and salt in a small pot over medium heat and bring to boil. Reduce the heat and simmer the berries for 2 minutes. Remove from heat. Add the Earl Grey tea bags and steep for 3 minutes. Remove the tea bags from the pot.
- Pour the mixture through a fine mesh sieve, a bit at a time over a bowl. Press the berries against the sieve with a large spoon to squeeze out their juices. Stir the vanilla into the blueberry Earl Grey tea. Let cool until safe to pour into popsicle molds.
- Carefully fill your molds, leaving about ¼ inch of room at the top as the popsicles will expand as they freeze. It's easiest and the least messy to use a jug or pitcher with a spout to do this. Wipe any excess from the top so that it doesn't freeze and make unmolding difficult. Add the popsicle sticks* and freeze for at least 5 hours or overnight.This recipe yields about 6-8 popsicles depending on the size and shape of your popsicles molds.
Nutrition Info:
Notes:
The Nutrition Information is only an estimate. The accuracy of the Nutrition Information for any recipe on this site cannot be guaranteed.
This post may contain affiliate links which means if you click on the link and make a purchase, I may get a very small percentage in commission. There's never any extra cost to you, and I only link to products I actually use and enjoy. Thank you for your support!

Leave a Reply