

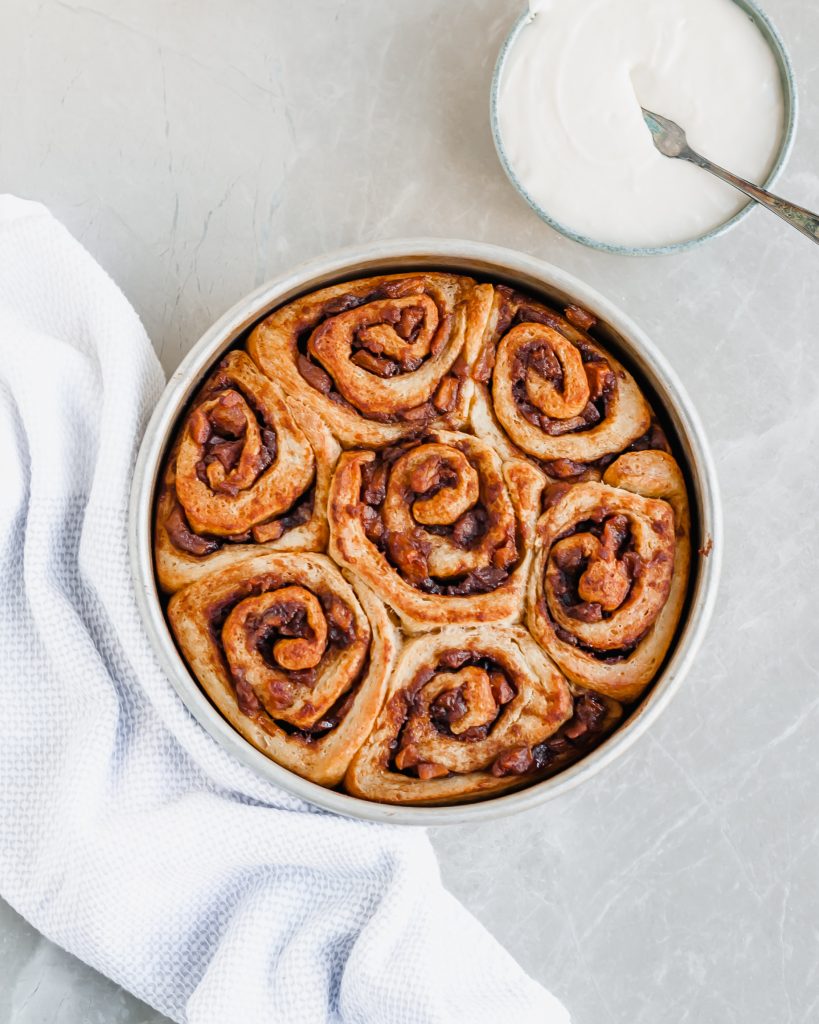
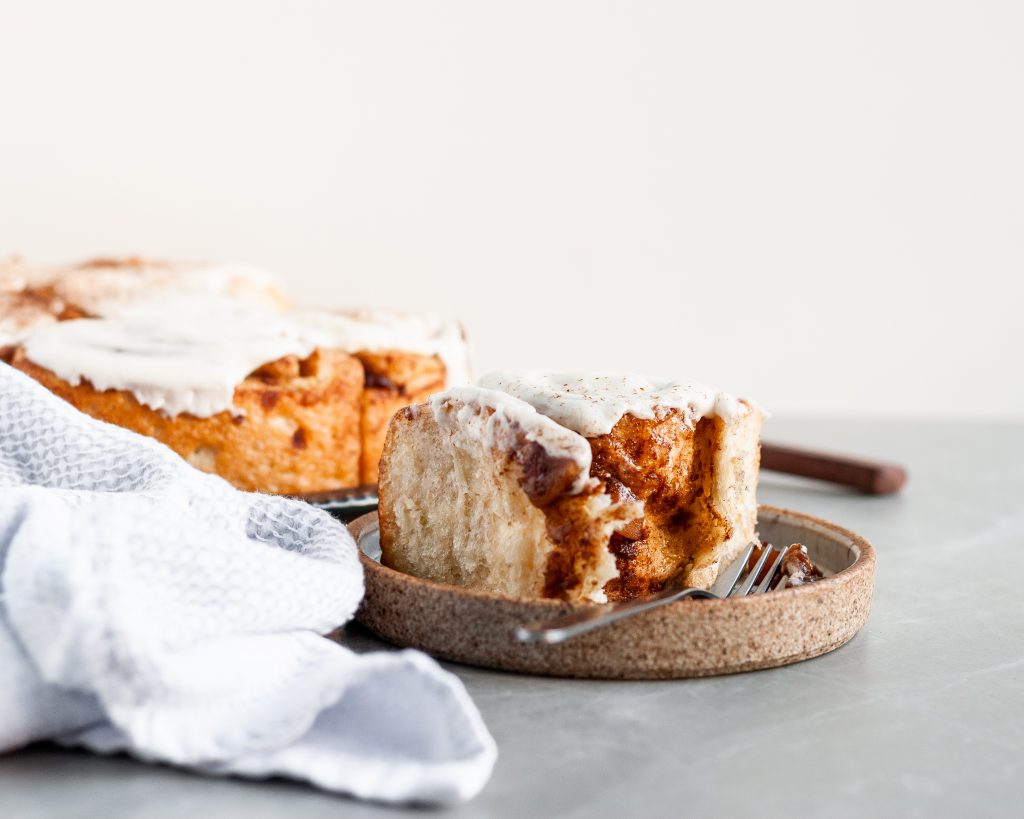
The weekend is here and I think we all need to treat ourselves to something delicious and comforting. Enter: these lush apple pie cinnamon rolls. An easy homemade apple cinnamon pie filling is rolled up in a tender, fluffy dough, baked and then slathered with a luscious vanilla glaze. And yes, they’re vegan, but no one would ever guess. Promise.

If you’re like me, the cinnamon roll obsession is not going away anytime soon. There’s just a certain kind of enjoyment I get when I have one which I don’t get from other baked goods. Cinnamon rolls are homey, comforting, and totally indulgent but don’t raise eyebrows at the breakfast table like say, a layer cake would. They’re like an acceptable breakfast dessert for some reason. And I’m not about to question a good thing…

When I was testing apple cinnamon rolls, I tried using diced fresh apples and while they were good, they just didn’t have the caramelized flavor I was after which you get in an apple pie. Cooking the apples gently was the ticket to a perfect filling.
Tips for Perfect Apple Pie Cinnamon Rolls:
- Use a firm and flavorful variety of apple. The apples will be cooked and then baked so we don’t want the apples to end up mushy. Firmer varieties like Honeycrisp, McIntosh, Braeburn, Pink Lady, Granny Smith and Jonagold are great options. I avoid using varieties like Red Delicious which are mealy and turn to mush quickly.
- Cool your cooked apple mixture to a bit warmer than room temperature before assembling the rolls. We don’t want to kill the yeast before baking. Also, hot apples are going to make your dough a slimy mess which is super hard to handle.
- Don’t overheat your non-dairy milk. If you don’t have a thermometer, place a drop of it on your wrist when you think it’s cool enough. If it feels hot, it probably needs to cool a bit. It should be a comfortable heat on your skin.
- Spray or wipe oil on your rolling surface and hands instead of flour. Not only does this make working the dough easier and things less messy, it helps ensure that you don’t add too much flour and end up with dry rolls.
- If you are making the rolls at night for the morning, place the dough in a large oiled bowl and cover tightly with plastic wrap. In the morning, you can prepare the rolls and then give them a second rise. I’ve assembled the rolls and placed them in the fridge overnight and, while they taste great, they end up looking a bit caved in. This is because they’ve had too long to rise and so the structure of the dough isn’t as strong, so they collapse. The flavor will be great, but I’m not as fond of the texture or the look of them with that method.
- Roll out your dough evenly and try to get a rectangular shape. If it’s not perfect, it’s not the end of the world – the end rolls will be a bit misshapen but they taste just as good!
- Once the filling is spread over the dough with a long end closest to you, start with a tiny roll, pulling gently towards you and then over, so that the dough is tight. Once the first rotation is done, roll tightly but without pulling. Pinch the ends closed if you find the filling is squishing out. If you roll them too tight, the centers will pop up during baking. If they aren’t caught while they are doing this in the oven and gently flattened back down with the back of a spatula, the centers won’t be gooey. They will be standing tall outside the rolls and be crunchy. When placing them in the baking pan, give each roll about 1/4″ around it to grow – if the rolls are too tight against each other, the centers will pop up.
- When cutting the rolls, use either a serrated knife to gently cut back and forth, or a piece of flavorless floss. Using a regular knife can squish the rolls. To use floss, slide the floss under the log of dough and then taking an end of the floss in each hand, lift it up and then cross over the roll until the floss has cut through the dough. I also like to mark the dough where I’ll be cutting so that each roll is the same size.
- Bake your rolls in the center of the middle rack. Rotate the pan once during baking and keep as eye on them in the last 10 minutes or so. If you don’t have an internal oven thermometer, the temperature your oven tells you it’s at might be a lie. (All of my ovens have lied to me.)
If you make these Apple Pie Cinnamon Rolls, please let me know in the comments below. Feel free to give it a rating! Also, I love connecting on Instagram where you can tag me in your creations using my recipes. I love seeing what you’re up to in the kitchen! Thanks for reading along and I hope you enjoy this recipe!

Apple Pie Cinnamon Rolls
Ingredients
For the Dough:
- 4 cups all-purpose flour
- ⅓ cup granulated sugar
- 4 tsp dry active yeast*
- 1 tsp salt
- 1 ½ cups non-dairy milk
- ½ cup refined coconut oil**
- 1 tbsp vanilla extract
For the Apple Filling:
- 3 lbs firm apples, peeled and cored, cut into 1/4″ pieces (
- ½ cup refined coconut oil or vegan butter
- 1 cup brown sugar
- 3 tbsp ground cinnamon
- ½ tsp salt
For the Vanilla Glaze:
- 4 tbsp vegan butter (softened if using the stick kind)
- 2 cups confectioner’s sugar
- 1 tsp vanilla extract
- 2-4 tbsp non-dairy milk
Instructions
To Prepare the Apple Filling:
- In a medium-sized pot over medium heat, melt the refined coconut oil or vegan butter, add in the apples, brown sugar and cinnamon. Stir well and bring to a simmer. Turn the heat down to low, and cook for 20-25 minutes or until most of the juice has cooked off but the apples are still firm. Stir in the salt, and set aside to cool to about 115°F.
To Prepare the Dough:
- In a small saucepan over low heat, melt the coconut oil and then add the non-dairy milk, bringing the mixture to 110-115°F (if it gets too hot, let the temperature come down or it will kill the yeast.) Stir in the vanilla.
- In a large bowl with a wooden spoon or in the bowl of a stand-mixer with a dough hook attachment, mix the flour, sugar, yeast and salt together. Slowly stream in the warm milk and oil mixture. If using a stand mixer, run it on a medium-low setting for about 10 minutes. If doing it by hand, remove the dough from the bowl and on a lightly oiled surface with oiled hands, knead it for about 5-10 minutes (the longer the better!)
- Wash out the bowl and grease it. Form the dough into a ball, place it in the bowl and turn it over so both sides are oiled. Lightly cover and let it rise in a warm place for 1 1/2 hours or until about doubled in size.
To Assemble the Rolls:
- Line a 9 x 13″ pan with parchment paper, or oil well. Preheat the oven to 350°F.
- On a lightly oiled surface, roll the dough out into a rectangle about 20″ x 14″ (or about 1/4″ thick). Spoon the apple mixture over the dough, starting in the middle and working out making sure the apple bits are evenly spread around. With the long end closest to you, roll the dough up away from you evenly. Roll tightly by very lightly pulling the dough towards you are you roll. When finished, seal the end piece to the roll by making tiny pinches along the end length onto the roll. Push the roll over a bit so the seam is facing down. Using a serrated knife, cut the roll into 12 even pieces (I find cutting it in half then each half in half, then each of those into 3 helps keep things even). Place the rolls into the prepared pan cut side down. Cover lightly and place in a warm spot for 30-60 minutes.
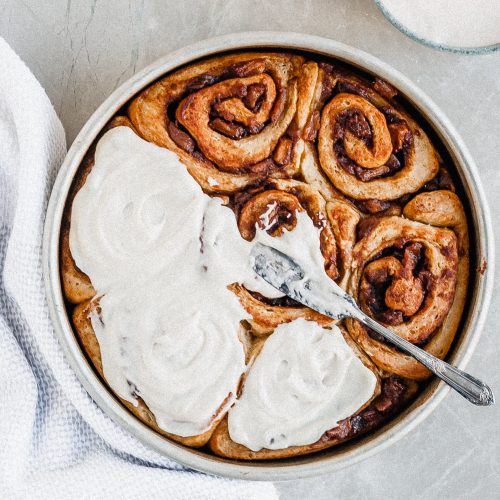
- Uncover the rolls, place them in the preheated oven and bake for 25-35 minutes or until the rolls are golden on top, and a toothpick inserted into a doughy part comes out clean. Remove from the oven, let cool for 10-15 minutes and spread with the Vanilla Glaze.
For the Vanilla Glaze:
- In a medium-sized bowl, beat the vegan butter until creamy. Add the confectioner’s sugar a half cup at a time until incorporated. Add in the vanilla and 2 tbsp of the plant-based milk. Beat until all of the lumps are gone. If it’s too thick, add more plant-based milk a tbsp at a time until it reaches the desired thickness. Spread over the slightly cooled rolls.
Maria
Saturday 7th of March 2020
I tried out this recipe yesterday and it was a major success and a massive hit with the family! The recipe is so easy to follow and I already can’t wait to make them again! Xx
Crumbs & Caramel
Sunday 15th of March 2020
Hi Marla! Thanks so much for the lovely feedback :) I'm so happy that you and your family enjoyed the rolls! ~Bronwyn