
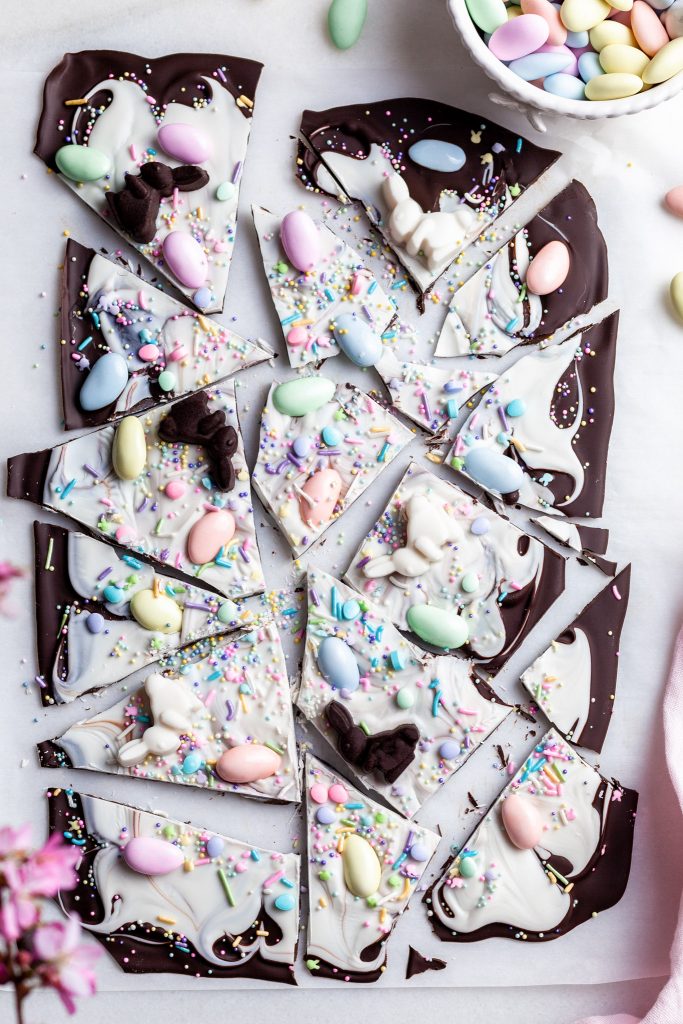
A quick and pretty vegan chocolate Easter bark that's a perfect homemade gift, or a fun way to use up leftover Easter candy. Dark and white chocolate are layered to form the base for all your favorite toppings. Easy enough for kids and addictive enough for grown-ups to sneak 'just one more' piece!
Thank you to Williams-Sonoma Canada for sponsoring this post. All opinions are my own.
If you've never made homemade candy before, chocolate bark is probably the least stressful recipe to try out the first time! If you can break up chocolate, melt and spread it out, you can make this fun confection! With just a couple of ingredients and a few minutes, this simple recipe is perfect for all ages. Just make sure to have a grown-up to help with melting the chocolate.
How to Make Chocolate Bark
Chocolate Easter Bark comes together so easily. Here are the steps to make it:
- Melt the chocolate.
- Spread the melted dark chocolate out on a parchment lined tray or marble slab.
- Layer the melted white chocolate over the melted dark chocolate.
- Sprinkle with candies or toppings of choice and let the chocolate set up.
- Break up the bark and enjoy!
If you'd like more of swirled effect instead of just layers, use half the amount of white chocolate and zig zag it over the melted dark chocolate. Drag a toothpick or a pointed knife to create pretty swirls in all directions.
I've gone with an Easter theme for this vegan candy bark, but you can customize the toppings and make it for any season or holiday! For my vegan chocolate Easter bark, I used Médicis Almonds (or French Jordan almonds) from Williams-Sonoma. They are Spanish almonds covered in a thin pastel-colored sugar shell. I thought they looked so much like cute little Easter eggs, and are not cloyingly sweet like many other Easter treats. I also used mini chocolate bunnies and a few different sized pastel sprinkles.

Customize Your Chocolate Bark
This chocolate treat is easy to customize to what you love and have in your pantry. Here are some topping ideas:
- any of your favorite candies
- chopped dried fruit like cranberries, raisins or dates
- freeze-dried fruit pieces
- nuts like pistachios, salted peanuts, or roasted pecans
- chopped or crushed cookies like Oreos, gingersnaps or speculaas
- pretzels
- small vegan marshmallows
- flakey sea salt
Keep in mind the sizes of your candies or candy bark toppings - smaller toppings work best so that your bark can be broken up easily. Using a variety of shapes and small sizes makes the bark even more interesting to look at. But, really, anything goes if the kids are just looking for a fun Easter project!
Chocolate bark makes for a thoughtful edible gift for friends, family, and teachers which can be packaged up in little tins, boxes or even canning jars. To round out your Easter basket, check out these pretty vegan cookie mix jars which are another fun DIY gift.

Tips for Melting Chocolate
While melting chocolate is a very easy process, it's very particular when it comes to heat and moisture.
Chocolate burns very easily and moisture can ruin melted chocolate, both which cause the chocolate to seize. Seizing means that the chocolate becomes hard, grainy and will no longer melt. This happens nearly instantaneously! Going slow when melting your chocolate and working with bone dry equipment and hands are best practices. Keep in mind how little heat (around 29°C-40°C [84°F-104°F]) depending on the type of chocolate) is actually needed to melt chocolate.
Chop your chocolate into even-sized pieces so the chocolate melts consistently without hot spots.
Stir frequently and gently. Aggressive stirring or whisking will draw air into your chocolate so you'll end up with air bubbles in your bark.
Use a rubber or silicone spatula or a metal spoon to stir your melting chocolate. If you use your spatula for cooking, check to see that it hasn't retained the scent of garlic, onion or other strong odors which can end up in your chocolate. Wooden or bamboo utensils aren't recommended because they can retain moisture which can transfer to the chocolate.
Tips for Working with White Chocolate
White chocolate, whether it's dairy-free or vegan, requires a little more attention because it seizes even more easily than 'real' chocolate which contains cocoa solids. If you've never worked with it before, I recommend using the double boiler method (see below). It's much more difficult to scorch or seize your chocolate (white or otherwise) using this method. It is very easy, on the other-hand, to burn your chocolate in the microwave. Literally a couple of seconds too long can ruin your chocolate.
If your white chocolate seems a bit thick, do not add any water. Instead, if you are working with a thicker variety, you can add a teaspoon or so of shortening to help thin it out.
I've tested this recipe with two different types of dairy-free white chocolate. The first was with a vegan white chocolate by King David which was very white, tasted more like candy melts, and was quite sweet. While it melted very smoothly and was thinner, it set up very quickly over the melted dark chocolate. I had to move quickly before it set completely so the candies and small chocolates would stick. The second dairy-free white chocolate by iChoc was much more delicious, but required some thinning with shortening and was off-white. This second option was vanilla bean flavored, hence the slightly darker color. It set up more slowly so sprinkling the toppings on was much more leisurely.
If your white chocolate sets up before you've added your bark toppings, you can use a hair-dryer to melt the surface (I know, odd, but it works!) Use the hair dryer on low so you don't create craters or burn the chocolate. Move back and forth slowly, not stopping for too long in any one spot to prevent seizing. Just be careful not to heat the dark chocolate once it sets - this tends to cause it to become discolored and splotchy looking.

How to Melt Chocolate in a Double Boiler
Using the double boiler method for melting chocolate is the safest way to melt chocolate. It melts chocolate in a less intense and more consistent manner than a microwave can.
You can buy a double boiler which is basically two pots which stack perfectly on top of each other, or you can make one by stacking a heat-safe bowl over a pot.
To use a double boiler, add a couple of inches of water to the bottom of a pot. Turn the heat up to medium. When the water is simmering, reduce the heat to barely simmering. Select a heat-safe bowl which is wider than the pot so it sits securely on top. A bowl that is too small can slip down into the pot, or allow steam to escape between the two introducing moisture to your chocolate. Add the chopped chocolate to the bowl, place on top of the pot and stir as the chocolate melts.
Wearing oven mitts, remove the bowl from the pot when there are only a few tiny pieces (the size of peas) of chocolate left to melt, wiping the moisture from the bottom and sides of the bowl. With a bit of gentle stirring, the rest of the chocolate will melt.
How to Melt Chocolate in a Microwave
If you use the microwave to melt your chocolate, do so at 50% power. Resist the urge to set the chocolate in the microwave for more than 30 seconds at a time. Heat it 30 for seconds, take it out, stir the chocolate and then heat for another 30 seconds. Repeat this until the chocolate is melted which should take about 1.5-2 minutes.

What to Do with Seized Chocolate
Overheating or adding moisture will cause the chocolate to seize. You'll know if your chocolate has seized if it becomes rough and grainy in places.
It's possible to fix the chocolate if it's just started to seize from overheating (but not if it's seized from moisture.) Remove the chocolate from the heat, and try adding a teaspoon of shortening , vegetable oil but ideally cocoa butter (if you have it). Stir well to see if the chocolate comes back together.
While seized chocolate is too difficult to work for some uses (bark, candy coating, drizzle, etc), the chocolate is still safe to eat.
How to Keep Chocolate Bark from Melting or Blooming
This chocolate bark is a simple vegan chocolate candy recipe which is bound to be eaten up before it has a chance to melt on little hands or to bloom. Bloomed chocolate is when the cocoa butter separates from the cocoa solids, leaving greyish white splotches on the surface (which is safe, just isn't as pretty). Blooming can happen if the chocolate goes through temperature changes. Examples are if the chocolate has been in the fridge, or has been melted and cooled for a bit without tempering.
That said, if you're looking for the type of glossy chocolate candy bark that doesn't melt as easily, gives a pleasant snap when you break it, and maintains its beautiful finish much longer, you'll need to temper your chocolate before making the chocolate bark. Tempering chocolate can be a little tedious so I usually don't bother with it for my homemade chocolate treats, but if you'd like to try it out, Ghirardelli has a great tutorial on how to do it.

I used a beautiful marble pastry board from Williams-Sonoma for making the chocolate bark - while it's intended for (you guessed it) making pastry, it's great for making chocolate bark and tempering chocolate as well. Marble has a high thermal mass and can absorb heat from things (like melted chocolate). I discuss this a little in my Baked Alaska post where I use marble to help keep the ice cream chilled longer during serving.
For making , serving, storing and gifting your chocolate bark, be sure to check out Williams-Sonoma's beautiful range of kitchen and tableware. They have the sweetest Easter collection - I featured their cute bunny bowl in this post which is sure to be part of our Easter tradition for years to come!
More Vegan Easter Recipes:
- Spiced Carrot Loaf with Maple Glaze
- Chocolate Chip Spice Hot Cross Buns
- French Onion Tart
- Asparagus &; Pesto Cashew Cheese Tart

Vegan Chocolate Easter Bark
Ingredients
- 8 oz vegan dark chocolate
- 8 oz vegan white chocolate Use 4 oz (113 g) for delicate swirls rather than a solid layer
- 1 tsp shortening, neutral tasting vegetable oil or cocoa butter, optional
- 1-2 cups Médicis almonds or other small candies See notes for other topping suggestions
- 3 tablespoon sprinkles
Instructions
- Lightly grease a large baking sheet and then line with parchment paper (or a silicone liner). Greasing the pan will help prevent the parchment from sliding around later. You can also use a marble pastry slab with parchment paper (so you can easily remove the chocolate bark later).
- Melt the dark chocolate. You can do this in a double boiler or the microwave. Microwave Method: Use a microwave-safe glass or ceramic bowl which retain heat best. On 50% power, heat the chopped chocolate for 30 seconds, stir and then heat again for 30 seconds. Repeat this until you have small pea-sized pieces of unmelted chocolate left, stirring gently until they are melted. Chocolate burns and seizes very easily so it's best to go slow and steady. This process should take 1½-2 minutes. Double Boiler Method: Add a couple of inches of water to the bottom of a pot. Turn the heat up to medium. When the water is simmering, reduce the heat to barely simmering. Select a heat-safe bowl which is wider than the pot so it sits securely on the pot (or the nesting pot if you have a double boiler pot set). A bowl that is too small can slip down into the pot, or allow steam to escape between the two, introducing moisture to your chocolate. Add the chopped chocolate to the bowl, place on top of the pot and stir as the chocolate melts. Wearing oven mitts, remove the bowl from the pot when there are just a few pea-sized pieces of chocolate left to melt, wiping the moisture from the bottom and sides of the bowl. With a bit of gentle stirring, the rest of the chocolate will melt.
- Pour the melted dark chocolate on the prepared baking sheet or pastry slab. Spread the chocolate out into a rectangle about ⅛" (3 mm) thick. For a Layered Chocolate Bark: let the dark chocolate set up until it's no longer liquid but still very soft. This takes about 20 minutes depending on the temperature of your home, but you can speed things up by sticking it in the fridge for 5 minutes. Don't let the chocolate completely set though, or the white chocolate may not bond properly and separate when the bark is cut later. Melt the white chocolate once the dark chocolate is looking ready.You may need to add a teaspoon of shortening if the white chocolate is quite thick. If using the microwave method, keep in mind that white chocolate seizes much easier than dark chocolate so go slow. For a Swirled Chocolate Bark: use only 4 oz (113 g) of white chocolate. Immediately drizzle it all over the dark chocolate. Drag a toothpick or tip of a sharp knife through the white chocolate into the dark chocolate areas to create swirls.
- Before the white chocolate firms up, arrange the candies, sprinkles or toppings of choice. Gently press them into the melted chocolate so they stick to the chocolate once it sets. Let the chocolate bark set up in a cool, dry spot. The chocolate should be set in about an hour depending on the temperature of your home. If you're in a rush, you can place it in the fridge (about 15 minutes) or freezer (about 5 minutes) although this may cause the chocolate to bloom within a couple of days. See blog post for more information and how blooming is only an aesthetic issue and is still safe to eat. Once set, break the chocolate bark into pieces as desired. For pieces with clean lines, slide the bark on the parchment paper onto a cutting board and use a hot large sharp knife to cut up the bark as desired. To heat it, dip the blade in hot water, wipe dry and cut. Reheat and wipe the blade as needed.
Notes:
- any of your favorite small candies
- chopped dried fruit like cranberries, raisins or dates
- nuts like pistachios, salted peanuts, or roasted pecans
- chopped or crushed cookies like Oreos, gingersnaps or speculaas
- pretzels
- small vegan marshmallows
- flakey sea salt
The Nutrition Information is only an estimate. The accuracy of the Nutrition Information for any recipe on this site cannot be guaranteed.
Post may contain affiliate links which means if you click on the link and make a purchase, I may make a very small percentage in commission on qualifying purchases. There's never any extra cost to you, and I only link to products I actually use and enjoy. Thank you for your support!

Leave a Reply