
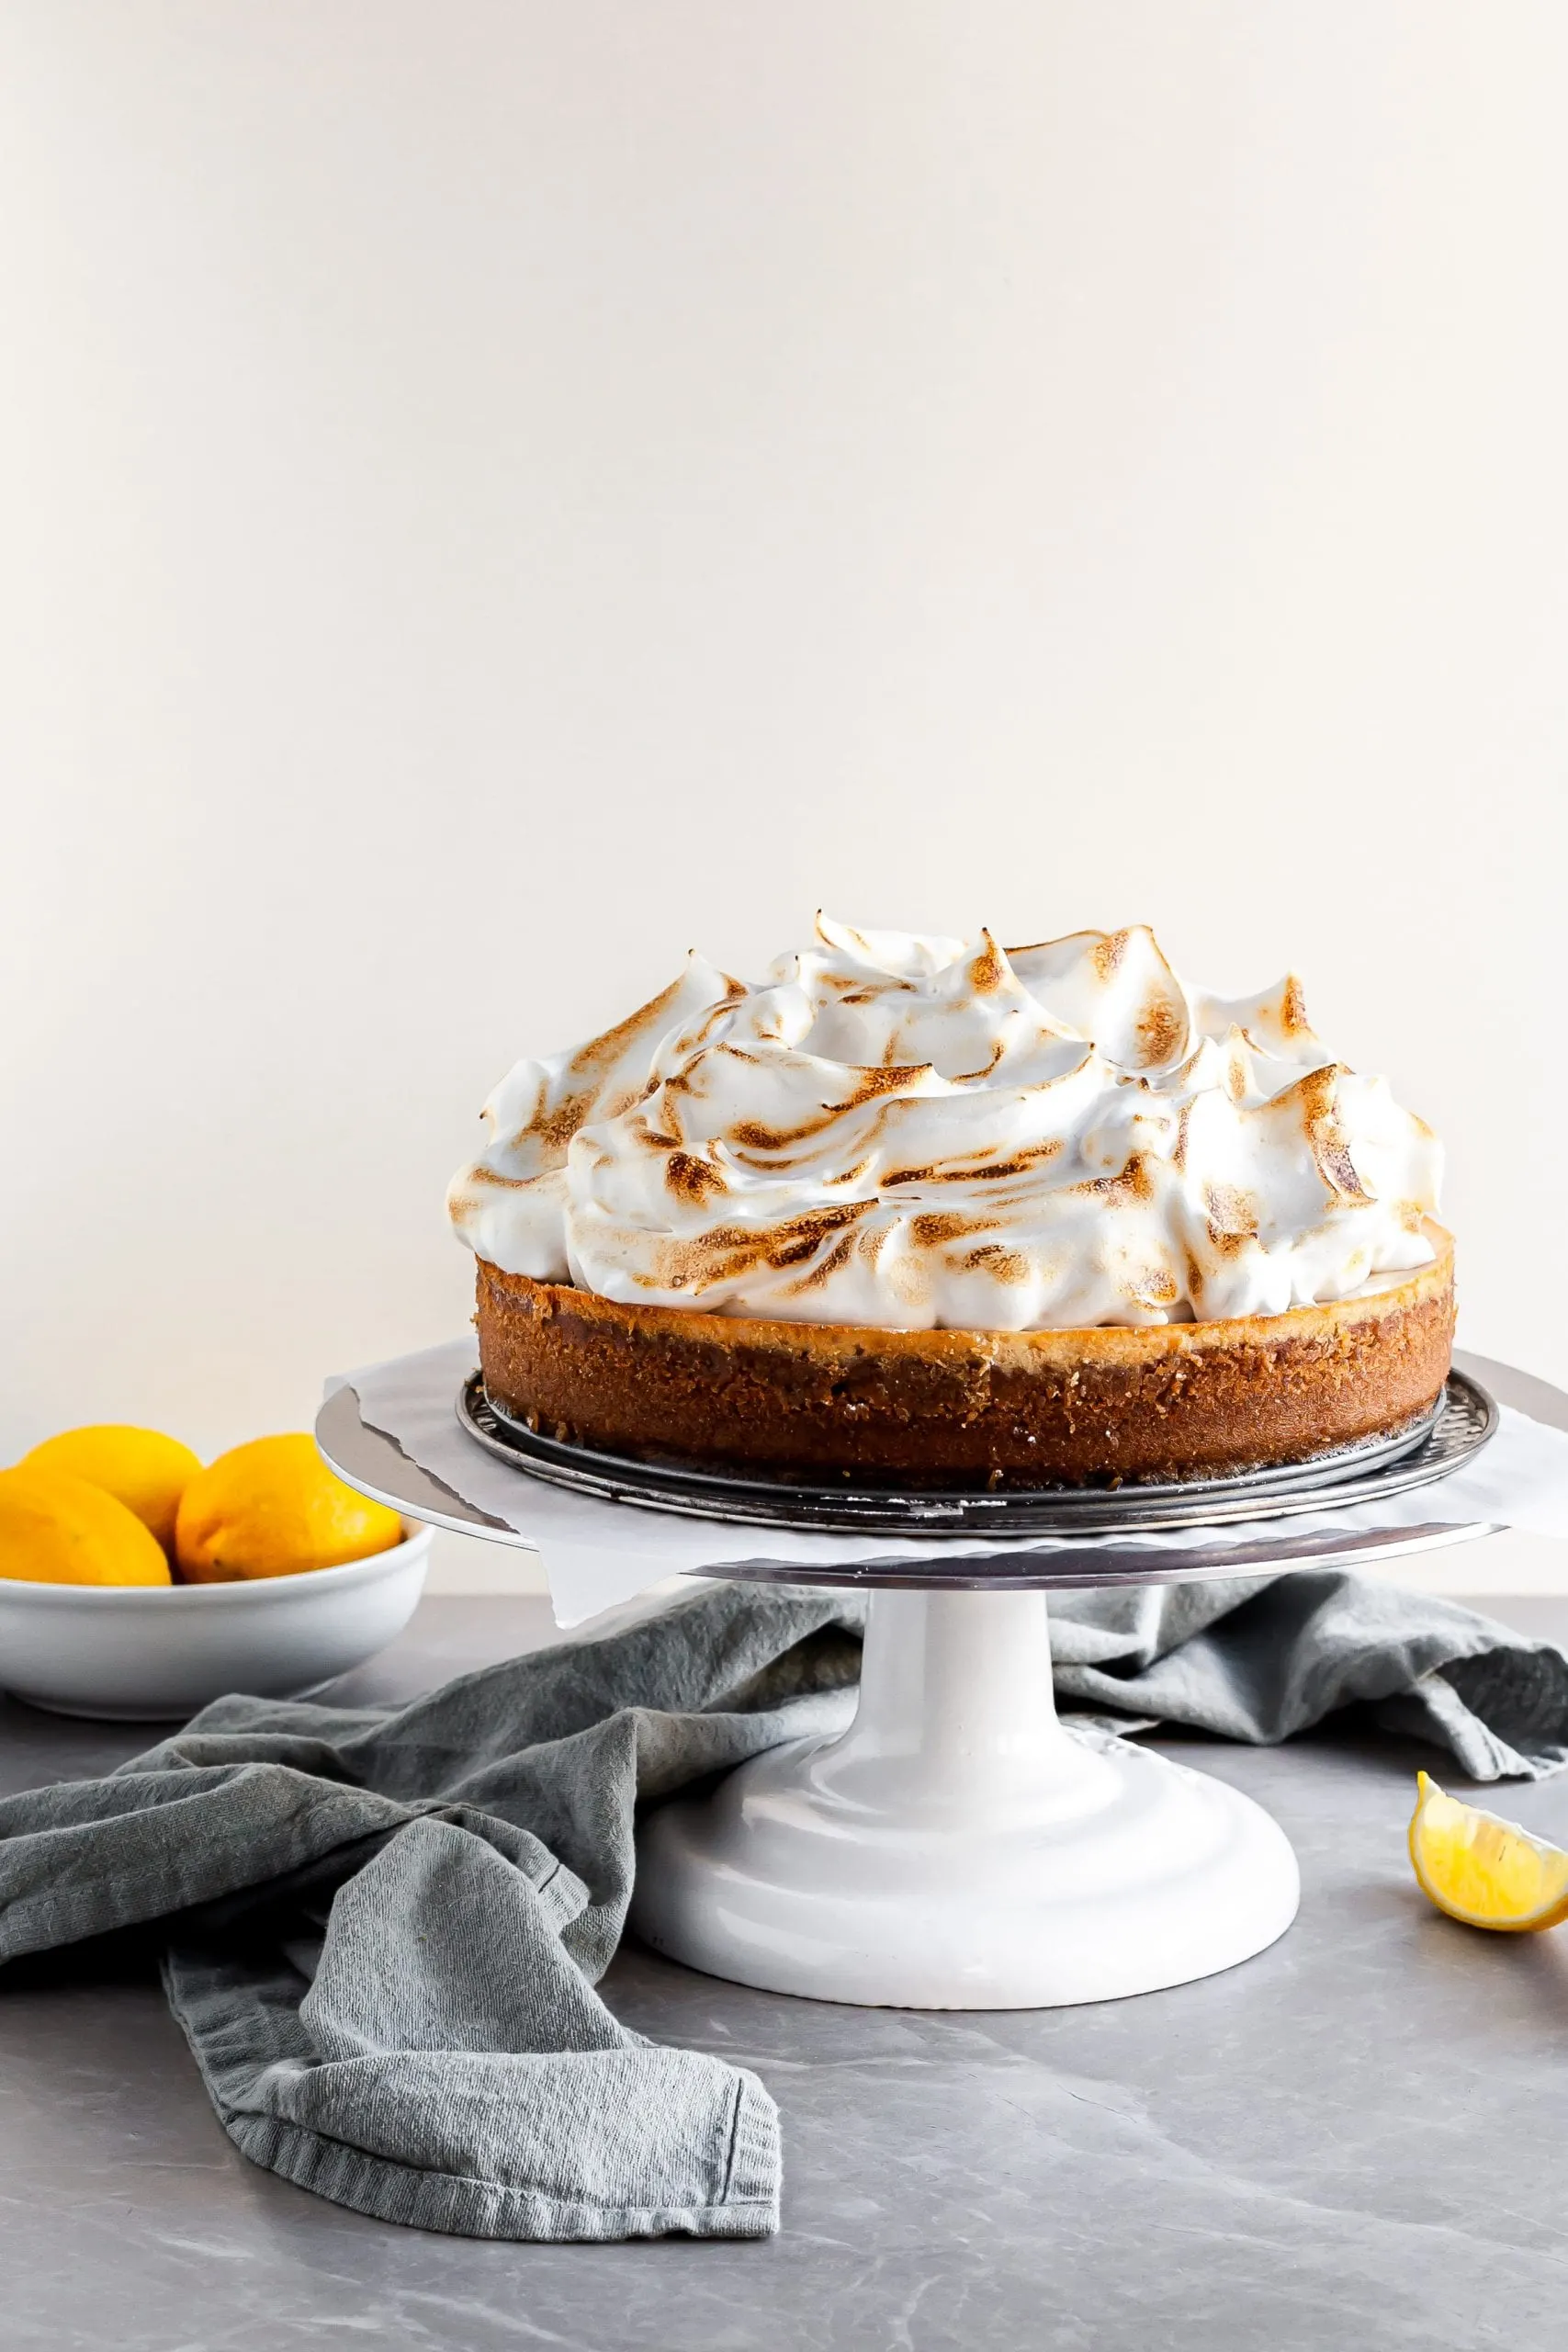
This lemon meringue baked cheesecake is everything you’d hope for in a showstopper dessert that is completely and unassumingly vegan! A creamy, lusciously dense lemon cheesecake is served with a cloud of meringue on top for a beautiful and decadent treat!
I’m so excited to share this recipe with you! This vegan baked cheesecake is just as delicious as one made with eggs and dairy. One of my goals in creating recipes to share with you, is to show you how easy it is to make food without animal products that is every bit as tasty as those that do. Cheesecake and meringue can be easily created without the use of any eggs or cheese, and the results are just as mouthwatering!
First off and foremost, this is not a difficult recipe despite the length of this blog post so don’t let that sway you from this recipe. Au contraire! If you aren’t super experienced in vegan baking, I’m hoping that the information I provide below empowers you with solid information and sets you on a successful course of vegan cheesecake and meringue making!
The basics to creating this vegan lemon meringue baked cheesecake:
- mix 3 ingredient crust and bake
- blend the cheesecake filling ingredients together
- pour the filling into the crust and bake
- whip up the meringue and top your cooled cheesecake with it
- torch the meringue and enjoy!
What is Vegan Cheesecake Made of?
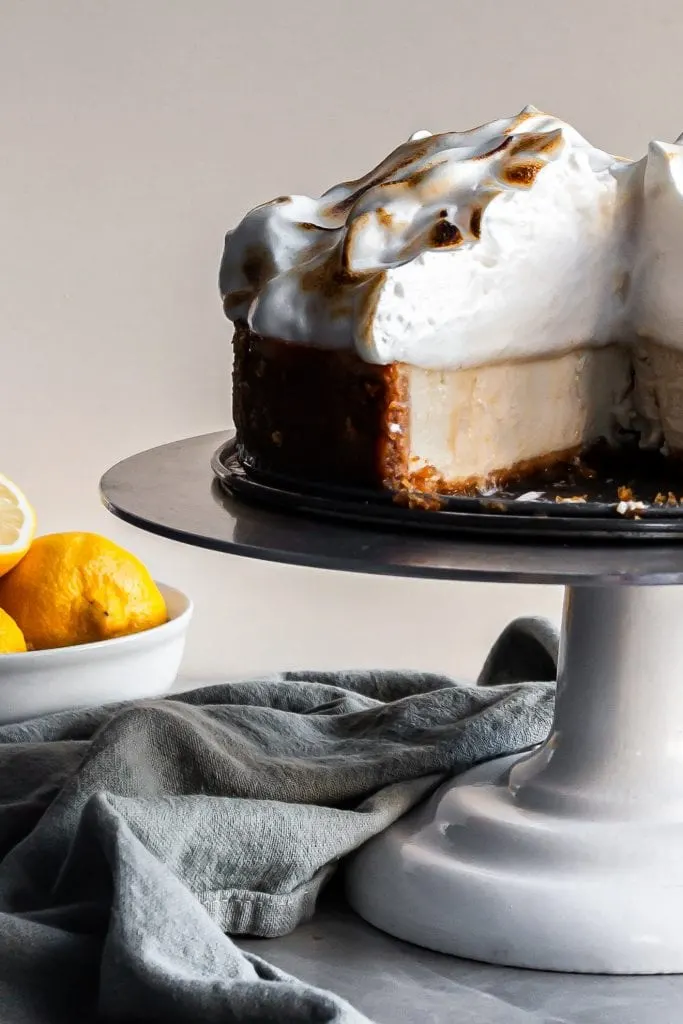
While there’s a lot of vegan cheesecakes out there, many call for freezing various combinations of blended nuts and sweeteners. They are delicious but they just don’t taste like baked cheesecake. That amazing, rich, creamy baked cheesecake experience is what we’re after here.
Vegan Cream Cheese for Flavor
Most non-vegan American style cheesecakes contain a lot of cream cheese and eggs for the bulk of the cake. For this recipe, cream cheese is not replaced by equal amounts of vegan cream cheese. While vegan cream cheese products have improved a lot in terms of texture and flavor, they still tend to behave more like a lower fat dairy cream cheese. As a result, they don’t hold up the same way in baking like full-fat cream cheese does. So instead of 3 or 4 packs of vegan cream cheese, I only use one in this recipe. It gives us the flavor we’re after, but we leave the structure to other ingredients.
Soaked Cashews for Creaminess and Density
When soaked and blended, cashews become the perfect base for rich, creamy desserts considering that they are also mild and buttery in flavor. The cashews get a head start by being quick soaked by simmering in lemon juice – this is faster than overnight soaking, and also infuses them with lemon flavor!
Silken Tofu for, well, Silkiness and Body
The other important component of this vegan cheesecake is tofu. Now before I lose you, hear me out! The variety of tofu used in this recipe is not the same as what you see in the cooler section at the grocery store. This recipe calls for extra-firm *silken* tofu. It has almost no flavor and is silky smooth (hence “silken”.) You can find it in tetra-paks on shelves in most grocery stores and on-line. Take note that there are different degrees of firmness from soft to extra-firm – extra-firm will produce a cake which holds its shape and slices nicely without being too soft.


Tips for Making Vegan Cheesecake:
Prepare your oven.
Ensure your oven is preheated before you put your cake in. The temperature display on ovens are often inaccurate, so investing in a small oven thermometer is a great idea to ensure success in any baking. My ovens have always run cool, with the exception of one diva which ran high and cool depending on its mood – I had to adjust the temperature every time I used it, sometimes during baking. Yes, it was very annoying, but because I had that little oven thermometer, under-baking or over-baking was prevented!
Also, have enough space to slide the cheesecake in onto a middle rack, which may mean removing a rack. Do this ahead of time so you aren’t trying to move racks around and letting the heat out when your cheesecake is ready to go in.
Use a water bath.
A water bath isn’t absolutely critical but it does help with a couple of things – even baking and lighter cheesecake color. The water bath helps conduct the heat evenly around the cheesecake and prevents the edges from becoming a lot drier than in the center. Also, the cheesecake won’t darken as much when a water bath is used.
To make a water bath, line the outside of your spring-form pan with aluminum foil, ensuring that the ends of the aluminum foil is higher than the seams of the pan so water doesn’t leach in during baking. You’ll want to crimp the ends well above the water mark. Set aside and pour scalding water into a wide pan with sides, large enough to hold your spring-form pan. You’ll want about 3/4-1″ of water. Don’t fill it to the top, or it will overflow once you add the cake. Carefully place the pan of water into the oven during preheating. Once the cheesecake is ready for baking, gently place the foil wrapped pan into the hot water bath.
Use room temperature vegan cream cheese.
This helps reduce your chances of having any lumps in your cheesecake.
Get those air bubbles out!
Air becomes trapped in the cheesecake mixture during the blending of the ingredients. If left there, the air bubbles can cause cracks and puffing in the cheesecake during baking. To prevent this: once the cheesecake mixture has been poured over the crust, pick up the pan with both hands about an inch or so from the countertop, and drop it. Do this a few times, or until you no longer notice changes (bubbles escaping) on the surface with each drop.
Don’t peek!
Opening the door during baking will let heat out. A change in temperature can cause cracking. Open the door only at the end when you need to check it, not in the middle of baking.
Cover the cheesecake only once completely cool.
Covering the cheesecake while still warm will result in condensation collecting on the surface of the cake, making it sticky and beaded with water. Once no longer warm, cover the cheesecake to prevent it from drying out and absorbing other food odors in the fridge. Let it chill completely before serving, about 6 hours. If you do cover it too soon, dab the surface gently with paper towel before adding the meringue (otherwise it will slide around.)
Be patient.
Once baked, turn off the oven and leave the door ajar. Let the cheesecake cool gradually. Once the oven is no longer hot, take the cheesecake out and let it cool on a wire rack for an hour. Use a sharp knife to loosen the sides, pressing into the pan rather than into the cake. Place uncovered in the fridge. And if you do end up with any cracks, don’t stress – you will be covering it with meringue anyway!


What is in Vegan Meringue?
Traditional meringue is made out of egg-whites. For a vegan version, the unassuming water chickpeas are cooked in makes an amazing substitute! This water is called aquafaba. You really have to try this for yourself to believe it! Once whipped and sweetened, there’s not much flavor to it, much like egg-based meringue. I’ve had so much fun in the kitchen experimenting with it, having made macarons, meringue cookies, brookies and yule logs with excellent results! It was just as fun topping this vegan cheesecake with it!
Tips for Making Vegan Meringue:
Choosing your aquafaba.
You can get aquafaba from store-bought chickpeas, but I prefer to create my own. Home cooked chickpeas are much cheaper and are dead easy to cook in a pressure cooker or Instant Pot. If you prefer to buy them cooked, look for cans without any additives. Some chickpeas are canned with anti-foaming agents. We don’t want these in our aquafaba because we need the foaming to happen once we start beating it! So look for a can which just has chickpeas and water.
Reduce the aquafaba.
Whether you buy your chickpeas or cook your own, drain the chickpeas over a bowl to catch the chickpea water. Strain it with a fine mesh sieve, measure the volume and then simmer it on the stove until it is half the volume you started with. A lot of recipes call for reducing the volume by 1/3, but I have had much better success reducing it by half. Chill it until you’re ready to use it. You’ll notice that once it’s cooled, it will thicken up a lot and will be like thick egg whites!
Don’t worry about the color or smell. Reduced chickpea water will be light brown and smell like cooked chickpeas (no surprise, right?) One of the magical things about aquafaba is the way it becomes white once it’s whipped and how it doesn’t really taste like much. We’ll be adding sugar, some acidity and vanilla later, just like with egg whites.
Make sure your equipment is spotless!
Meringue, whether it’s made with eggs or aquafaba, does not like fat. Even residual amounts can prevent the meringue from foaming and creating peaks. Ensure there’s no fat when creating the meringue by washing your equipment really well, and then wiping it down with a piece of paper-towel and white vinegar.
Use Cream of Tarter.
Cream of Tarter is an acidic powder and is a common ingredient in the baking or spice isles at the grocery store. One box will last you a long time and it’s very inexpensive. It helps stabilize the aquafaba so you get those tall, impressive peaks! You can use white vinegar but the Cream of Tarter has a nicer flavor. Lemon juice would taste great, but it’s not as acidic and the bottled variety often has lemon oil added to it (which as mentioned earlier, will prevent the meringue from whipping up.)
Whip it!
While reduced aquafaba behaves very much like egg whites, it does act a little differently during whipping. First, it takes longer so if you have a stand-mixer, this is the time to use it. A hand-mixer works as well but can take up to 10 minutes to reach stiff peaks.
Unlike egg whites, you can’t over-beat aquafaba. Once egg whites reach the stiff peak stage, they can become dry and break if you keep beating. This doesn’t happen to aquafaba, which takes us to the next tip:
Don’t over-mix once the sugar is added.
With egg whites, most recipes say to beat the meringue until you can’t feel the sugar when you rub the mixture together between your fingers and it has become really glossy. Anytime I’ve done this aquafaba though, it deflates. So add the Cream of Tarter to the aquafaba, beat until stiff peaks then mix in the sugar and vanilla and turn the beater off once blended.
Or…make a completely stable meringue!
Aquafaba meringue is pretty stable with the Cream of Tarter in it but it will soften and lose volume with time unless it’s completely baked (which we don’t do with meringue topping.) If you’d like to keep your peaks as stable as possible on your cheesecake, especially if you’re transporting it or not eating it right away, I recommend making my stable version.
For the completely stable meringue, use agar.
For this version, we make sugar syrup mixed with powdered agar agar until it reaches the firm-ball stage (around 250ºF). If you don’t have a candy thermometer, check out this tutorial . Agar agar behaves a lot like gelatin but it’s made from seaweed (red algae.) Instead of adding sugar to the meringue, you carefully stream the hot agar syrup into the whipped meringue. Once the sweetened meringue starts to cool, the agar sets up and holds the meringue together perfectly. If it goes a bit soupy on you when you’re whipping at this point, stick it in the fridge for 10 minutes and then try again. In testing, the meringue didn’t lose any shape after 2 days and did not bead like egg-based meringue!
Get your torch out!
If you have a fun little kitchen torch, this is the time to bring it out. Toasted meringue adds dimension, color and a lovely flavor reminiscent of marshmallow. If you don’t have a kitchen torch, a couple of minutes under the broiler works but watch the meringue through the oven window. It will go from toasty to burnt in a manner of seconds.

If you try this Vegan Lemon Meringue Baked Cheesecake, be sure to let me know in the comments below and give it a rating in the recipe card! I love connecting on Instagram where you can tag me in your creations using my recipes. You can follow along with me on Pinterest and Facebook. Thank you for reading along!


Vegan Lemon Meringue Baked Cheesecake
Ingredients
- 1 cup raw cashews
- ¾ cup lemon juice
- ⅔ cup heavy coconut cream**
- 2 x 349 g extra-firm silken tofu*, drained
- 227 g vegan cream cheese
- ¾ cup granulated sugar
- 1 tbsp lemon zest, finely grated
- 2 tsp vanilla extract
- 1 tsp lemon extract
For the Crust:
- 1 ¾ cup vegan graham crumbs (or other vegan cookie/biscuit crumbs)
- ⅓ cup vegan butter (stick type, not tub), melted
- ¼ cup granulated sugar
For Stable Meringue:
- 1 cup aquafaba, reduced*** and chilled
- 1 tsp Cream of Tarter
- 2 cups granulated sugar
- ⅔ cup water
- 2 tsp agar agar
- 2 tsp vanilla extract
For Basic Meringue:
- 1 cup aquafaba, reduced***
- 1 tsp Cream of Tarter
- 2 cups granulated sugar
- 2 tsp vanilla extract
Instructions
For the Crust:
- Preheat the oven to 350ºF. In a medium sized bowl, combine the cookie crumbs, melted vegan butter and sugar. Mix well, and press into the bottom of a 9" spring-form pan, bringing the crust up the sides about 1.5 inches. Press the crust with the bottom of a flat measuring cup to ensure that the crust is firm and flat. Bake for 7-8 minutes, or until fragrant. Remove from the oven and set aside. Reduce the oven temperature to 325ºF.
- Prepare a water bath: pour about an inch of hot water into a large baking pan. (The pan needs to be big enough for the spring-form pan to sit it.) Place the water bath onto the middle rack of the oven.
- Cover the outside of a 9" spring-form pan with aluminum foil, ensuring the ends of the foil are higher than the seams of the pan and water level so water does not leach into the cheesecake during baking.
For the Filling:
- Place the cashews and lemon juice in a pot small enough that the cashews are covered with the lemon juice. Bring to a boil, reduce the heat and simmer for a few minutes or until the juice is mostly absorbed by the cashews. Keep an eye on them so they don't dry out and burn.
- Place the cashews in a high-speed blender or food processor with the coconut cream. Blend on high until smooth. Add in the rest of the filling ingredients and blend on high until the mixture of very smooth, scraping the sides down as necessary. Depending on your appliance, this can take anywhere from 2 to 8 minutes.
- Gently pour the filling over the baked crust. Smooth out the top with a spatula or large spoon. Holding the spring-form pan with a hand on each side, lift the pan about an inch off the counter and drop it so it lands evenly. This will help any air bubbles escape. Do this a few times or until you no longer see any changes to the top of the filling as air bubbles break the surface. Place the cheesecake into the water bath in the hot oven, and bake for about an hour. It should look set and be a bit browned on the edges.
- Turn off the oven, leave the door ajar and let the cheesecake rest until the oven is no longer hot. Remove from the oven, and let cool on a wire rack for about an hour. Using a small sharp knife, run it between with crust and the spring-form sides, pressing into the pan sides rather than the cake to prevent tearing. Lightly cover with plastic wrap until completely chilled, about 6 hours or overnight. Just before serving and topping with the meringue, release the sides of the pan and dab the surface of the chilled cheesecake with paper towel if there are any drops of condensation.
For the Meringue:
- Prepare your stand-mixer bowl and balloon whisk (or large bowl and hand mixer beaters) by wiping them down with white vinegar to remove any fat residue.
- Pour the chilled, reduced aquafaba and Cream of Tarter into the bowl, and whisk on high for about 5-10 minutes, or until stiff peaks form. This can take 3-10 minutes depending on your machine. The meringue has reached stiff peaks if it holds its shape when the whisk is turned upside down and the meringue peak stands and does not flop over.
- For basic meringue (more fragile and loses volume if not served right away), add the sugar and vanilla once stiff peaks are reached. Whip only until blended as over-whipping will deflate the meringue. Top with the meringue and toast with a kitchen torch, or place under the broiler for 1-3 minutes taking care not to burn it which happens quickly. Serve immediately.
- For stable meringue (keeps its volume and looks great for days), place the sugar, water and agar agar into a medium sized pot over medium-high heat. Bring to a boil, then reduce the heat to a simmer taking care not to boil it over. Using a candy thermometer, bring the mixture to hard-ball stage or 245-250ºF, brushing the sides of the pot occasionally with a very clean pastry brush dipped in water to prevent crystals from forming. Once hard-ball stage is reached, add in the vanilla extract taking care not to get burned as the mixture will sputter. With the stand-mixer running, carefully pour the hot agar syrup into the whipped aquafaba. Whip until blended. If the meringue loses volume and seems a bit soupy, put it in the fridge for 10-15 minutes to cool and then beat again. Top the chilled cheesecake with the meringue and toast with a kitchen torch, or place under the broiler for 1-3 minutes taking care not to burn it which happens quickly. Chill for 10 minutes and serve. Keep refrigerated.
bobbie
Wednesday 17th of November 2021
anxious to try this because every vegan cheesecake I see (filled with a LOT of vegan cream cheese) is too dense and never sets up like I want it to. I am curious about the agar agar: does it matter if it's powder or flakes? This looks amazing! Thanks - bobbie
Crumbs & Caramel
Wednesday 17th of November 2021
Hi Bobbie! Thanks for your interest in the cheesecake! I think I know what you mean - the unbaked vegan cheesecakes that are usually frozen to set? Either way, it often comes down to the amount and the brand of cream cheese used (some are very high in saturated fat to be firmer when cool, and others are very gummy and will never be firm unless frozen) and the amount and types of other ingredients like tofu or cashews. I was aiming for a cheesecake that was dense enough to slice but soft enough that it remained creamy and coats your fork/spoon when eating it. I tested with Daiya cream cheese because, at the time, that was all that was available to me in our local shops. This recipe isn't heavy on vegan cream cheese though b/c I recognize that there is such variability in what's available in the shops now, and so I added it more for cream cheese flavor not so much function. Have a read through the blog post on how the other ingredients like silken tofu helped create the texture. Perhaps that will give you a better idea of what kind of texture this recipe produces. I used agar powder in this recipe. If you do give this cheesecake a try, I hope it meets your expectations and the craving you're trying to satisfy! Please let me know if you have any other questions! :) ~ Bronwyn
Gretha
Saturday 5th of September 2020
Hi there. Your baked cheesecake meringue looks incredible. If I wanted to turn the stable italian meringue into a meringue buttercream, how much butter do you think I’d need to add?